Viewing: Printables - View all posts

Organizing Piano Student Binders 

This post first had its home on my substack, At Home with Classical Piano, which is where I write regularly now. Come join me there, or subscribe to my newsletter to stay in the loop and get posts delivered straight to your inbox!

It’s August…and that means school is just around the corner! And that means, it’s time to go school shopping again!

As you are getting ready to welcome piano students back into your studio this fall, I want to remind you of some resources in my shop that can help you get organized!

I give a one-inch, white, three-ring binder to each student. In the front of the binder, I slip Piano-opoly into the plastic sleeve. We use Piano-opoly to track progress - anything from completing a scale exercise correctly, to completing a song, to finishing a theory page. When students reach a square that says “prize,” they get to choose something from my prize box! Some of their favorites include:

Bouncy balls

Colorful music pens

Treble clef pencils

Puffy monster keychains

Mophead ballpoint pens

Brain teaser marble puzzles

Cute animal sticky notepads

Football fidget spinners

Fruity mechanical pencils

We keep track of their assignments on the Piano Tracker, where I write in detail what I want them to practice each week and students mark an X for each day of practice.

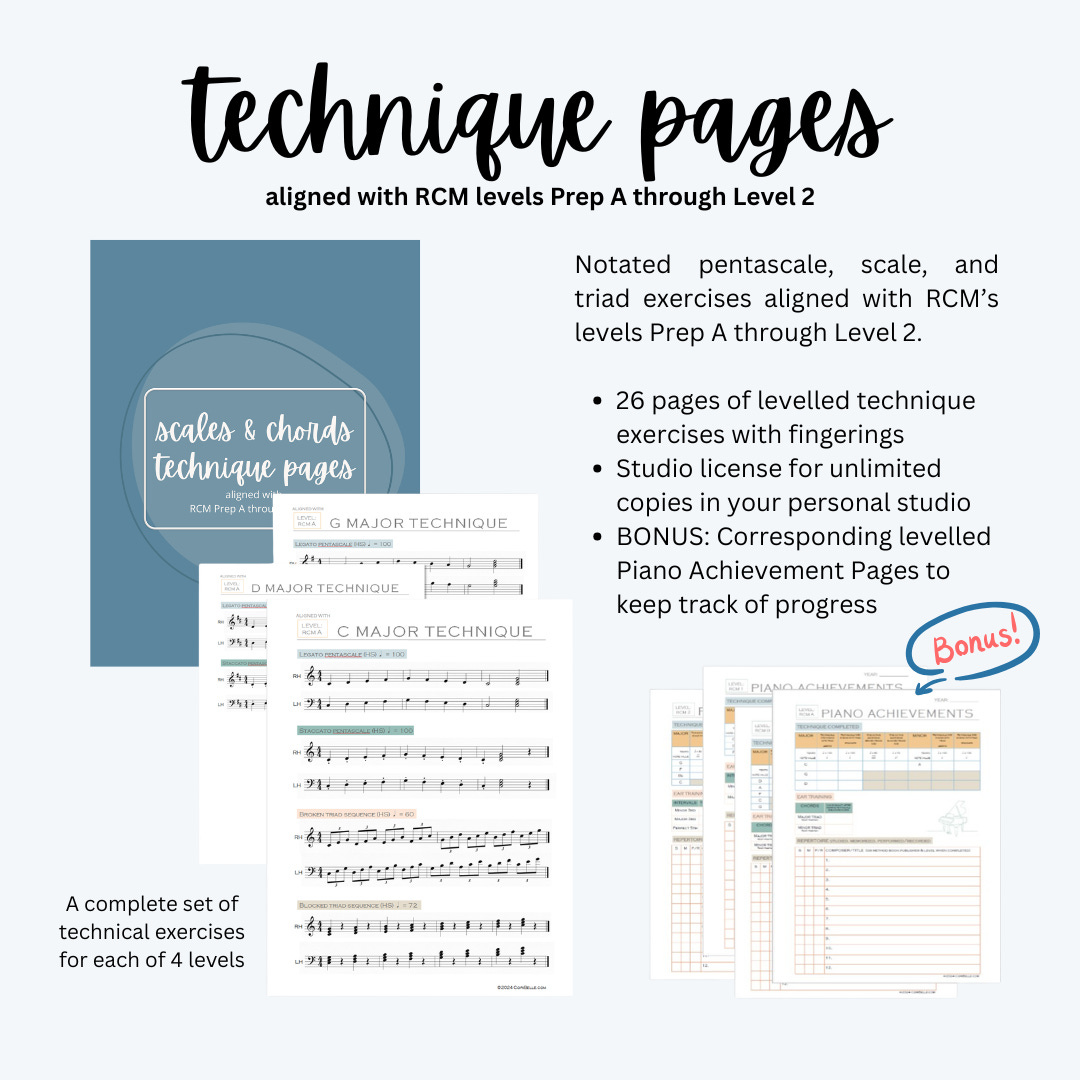
Students can see the progress they are making in technique and repertoire on their Piano Achievement page, which is aligned with the Royal Conservatory of Music levels. I use RCM’s technique requirements to guide students in a progressive study of scales and chords. I’m excited to announce that in addition to the achievement pages, I now offer corresponding technique pages for the first four levels (Prep A to Level 2) in my shop!

The technique pages make it easy for students to see exactly what they are to practice, with which fingering, in order to complete their technique requirements. If you already own the Piano Achievement pages, you’ll want to check these out!

I use colored tabs with labels to keep everything organized. I also keep my Studio Calendar and Studio Policy in plastic page protectors right after their Piano Tracker and before the tabs, for easy reference. Finally, I slip a Suggestions on How to Practice sheet in the back cover of the binder as a reminder for students.

You can watch a quick video of how everything is put together here.

The Piano Binders serve as a growing library of musical information for students as well as a place to house their assignments. The binders grow with the students and are a physical reminder of the hard work they put into practicing and music study, forming a portfolio of sorts that celebrates their achievements!

Many of the resources I mentioned above are free in my shop! Check them out!

Disclosure: As an Amazon Associate I earn from qualifying purchases. This means if you click on a link and make a purchase, I may receive a small commission. This commission comes at no additional cost to you and helps to support my music.

Free Piano Sheet Music Resources 

This post first had its home on my substack, At Home with Classical Piano, which is where I write regularly now. Come join me there, or subscribe to my newsletter to stay in the loop and get posts delivered straight to your inbox!

Whether you are a piano teacher looking for music for your students, or a pianist looking for something new to study or play for an upcoming performance, there are a growing number of resources for free music on the Internet. Generally, “free” music falls under the auspices of what is in the public domain - music that is out of copyright because it meets your country’s requirements for X years past the publication date. However, there are some generous folks who have made their arrangements for beginner-intermediate students available for free download. Below are some of my favorite resources:

Chrissy Ricker has a number of pre-reading and elementary arrangements, as well as a few intermediate selections on her Free Stuff page. You’ll also find quite a few teaching resources on the page as well! (And if you would like to support her work financially, check out her music on PopMusicPlus which has fabulous arrangements of popular songs at every level.)

Gilbert DeBenedetti generously offers his arrangements of classical music and folk tunes, as well as some original tunes, on his site, G major theory. Browse by level.

Making Music Fun is a wonderful place to find music history resources. Did you know you can also download their free sheet music arrangements? Browse by classical, patriotic, Christian, jazz, Christmas, celtic, or nursery rhyme categories, or find by level (1-5).

And, of course, everyone should know of the Petrucci Music Library, where you can find a huge assortment of classical music in the public domain. Search by composer, nationality, time period, or instrument difficulty (Piano levels are ordered by the RCM levelling system, which generally starts at year 2-3 of piano study. No pre-reading music here.).

Choral pianists and conductors in search of choral-only music can check out the Choral Wiki, where you can search by voice part. If you’re looking to strengthen your open score sightreading skills, this could be a great resource for you.

Recently, I took advantage of several of these websites as I am preparing summer music for my students. I always like to have something a little out of our “norm” for the summer to keep things fun!

What is your go-to resource for sheet music? Do you take advantage of any of these free resources, pay for a monthly subscription for access, or write your own? Let me know in the comments.

Beginner Piano Lesson Games 

Playing games in the piano studio is a great way to introduce and review concepts, change the pace of a lesson, and have fun around music! 

I especially like working games into lessons with my younger beginner students: playing with animal erasers, getting off the bench and onto the floor, and sometimes introducing a wee bit of competition! (Watch this with your young ones, though - often a cooperative game will be a better choice for preschoolers.)

Some of the concepts beginners need help with are:

  • Left and right
  • Finger numbers
  • Musical alphabet
  • Names of the keys on the keyboard

Left and Right

First, establish how a student will tell their right hand from their left. Sometimes we refer to a student's hand as “the hand you write with” or “the hand you throw a ball with.” I like to have students put their hands in the air in front of them, facing out, and form an “L” in each hand using their thumbs and pointer fingers. Only the left hand will form a proper “L” for “left.”

Play a simple Simon Says game, where you call out directions and the student puts their left hand on their ear, or their right hand pats their shoulder, or their left hand touches their shoe, etc.

Finger Numbers

Do a simple “finger warm-up” where the student puts his hands in the air in front of him, and then you call out fingers to wiggle: “Wiggle your ones” (thumbs), “wiggle your twos,” and so forth.

Trace the student's hands on a piece of paper. Toss a pom pom, cotton ball, or penny on the paper, trying to land on a finger. Ask the student to name the hand (left/right) and the finger number that the object landed on. If you'd like, have the student label the finger number with a pencil. Continue playing until all fingers have been labelled.

Musical alphabet train game beginner piano

Musical Alphabet

Students can practice their musical alphabet forwards and backwards with this simple train game! Additionally, they can practice finding “what comes next” and “what comes before” when given two consecutive letters of the alphabet.

Names of Keys on the Keyboard

Animal rescue and race beginner piano game printable

Animal Rescue and Race is a set of two beginner piano games that teach keyboard geography and direction.

In Animal Race to the Top, students construct a paper keyboard on the floor and then choose letter cards to race animals from bottom (left) to the top (right) of the paper keyboard. 

In Animal Rescue, animals are running loose in the zoo! Students must draw a letter card and put the animals back in their proper “cages” by finding the corresponding keys on the keyboard.

Of course, you can play both of these games right at the piano, too! But if your students are anything like mine, they will enjoy an opportunity to jump off the bench and play a game on the floor for a few minutes at the end of their lesson. (Maybe you will, too!)

Penguin piano build a keyboard printable game for beginner piano students


Penguin Piano is an extension of this activity. I like to use it as a take-home assignment that follows our games of Animal Rescue and Race. Students can take home one worksheet to cut and paste, or they can take home two sheets and race a parent or a sibling to form a proper keyboard with labelled keys.

You can find these last 3 games in my shop, as well as other resources for teaching piano! All come with a studio license, so you can print as many copies as you need for your students.

What are some of your favorite games for beginning piano students? Let me know in the comments!

Keep up with my writing by subscribing to At Home with Classical Piano on Substack.

Introducing...The Scarlatti Composer Kit! 

Scarlatti composer kit

I had so much fun putting this Composer Kit together! The life of Domenico Scarlatti is fascinating - his encounters with royalty, his different stylistic periods, his infamous duel with George Frederick Handel in Rome…and his experiments at the keyboard offer much fodder for discussion and exploration in student compositions!

Scarlatti wrote 555 keyboard sonatas, although not in the sonata-allegro form that we are familiar with in the Classical era. His sonatas are often in two parts, and include techniques like imitation, counterpoint, fast repeated notes, and crossing hands. He also plays with Baroque dance form and fiery dance rhythms from Spain, definitely a “Renaissance man”!

Students will love engaging in a Tic-Tac-Toe duel of organs and harpsichords, creating copycat fugues in a fun group game at the piano, and trying their hand at composition in the style of Scarlatti.

The Scarlatti Kit, like all of the Composer Kits in my shop, contains a 1-page biography (one sheet at the intermediate level, and one for younger readers), two games suitable for playing student-teacher or in a group setting, a playlist with suggestions of what to listen for, and a composition activity (one for beginners and one for intermediates).

I use these kits in group lessons once a quarter, but the materials are also great for composer study within private lessons, in homeschool co-op music classes, or as an independent take-home activity.

Find the Scarlatti kit here!

For more Composer Kits and a free resource, check out this link!

What's in my Student Piano Binders 

Part of my studio prep for fall is assembling Piano Binders for my new students and updating the binders of returning students. I grew up with a binder as a student myself, and in my studio I have tweaked the process a little to fit my teaching style. 

As part of their tuition, my piano students receive books and materials that I purchase for their lessons, including these binders. I use a 1-inch white, 3-ring binder with plastic cover so I can customize the cover. Here's what goes inside:

Piano-opoly practice incentive

Piano-opoly - My simple practice incentive game board slides into the plastic pocket on the outside of the binder and students can see at a glance how close they are to earning a prize!

Zippered pouch - I like these from Amazon, with a see-through mesh pocket and two zippered compartments. We use these for flashcards and small game pieces that I send home for practice.

Piano Practice Tracker - This is the student's assignment sheet. I designed it myself (there are several color variations, and you can get it for free in my shop!). If you print it double-sided and upside-down, you can punch it to put in the binder, and then use the back of it without re-punching the sheet by just flipping it over! Each week during the student's lesson, I fill out their practice plan, and it is their job to check the sheet each day to see what they are to work on, and put an “X” or write in the time on each day that they've practiced.

Studio Calendar - This goes in a plastic page protector and includes all the dates for lessons and breaks during the year.

Studio Policy - No excuses! I put this in a plastic page protector as well. It includes lesson information, practice tips, tuition and payment info, and my missed lesson policy. Parents receive an updated version via email at the beginning of each school year as well.

Syllabus - This is either a skills checklist based on beginning method books for my young students, or the RCM levelled checklists that you can find for free in my shop.

Technique - Printed scale and arpeggio charts with fingerings.

Music - Any sheet music that I give out during the school year goes here.

Composition - Student compositions that are assigned during the year during our group lessons (using materials from my Composer Kits) or private lessons.

Scales/Chords/Key Signatures - These are 3 separate tabs, but are meant to hold papers detailing how major and minor scales, chords, and key signatures are put together.

Music History - Students collect composer biographies (from my Composer Kits) and they live here.

The Piano Binders serve as a growing library of musical information for students as well as a place to house their assignments. The binders grow with the students and are a physical reminder of the hard work they put into practicing and music study, forming a portfolio of sorts that celebrates their achievements!

Do you use binders in your studio? I'd love to hear what you do with yours! Tell me in the comments!

Keep up with my writing by subscribing to At Home with Classical Piano on Substack.

Summer Music Camp T-shirts DIY 

I am always looking for ways to cut costs, and designing my own t-shirts for my Summer Music Camps is one way I can do that! 

summer music camp t-shirt design png svgsummer music camp t-shirt diy design png svg

Last year, I held two different camps for my beginner piano students and new recruits (The Great Music Race and MSA: Musical Secret Agent) and I designed a t-shirt for each specific camp. I was thrilled with the results (you can see them in my shop - click here and scroll down to Piano Merch). 

However, this year, I decided to try something a little simpler. I am holding two new camps, and instead of trying to produce a separate t-shirt for each one, I decided to go with a design that works for both. I think it turned out pretty well!

I made the design as a 300 dpi PNG file as well as a SVG file, so it can be used as an iron-on transfer or with a cutting machine. Iron-on transfer sheets can be purchased from any office supply store or online, and you print the design on them from your personal printer! (Be sure to choose “light” if you're printing on a light-colored shirt and “dark” if you're printing on a dark-colored shirt.)

Blank t-shirts can be purchased from a local craft store, like Michael's, or online, in a variety of colors and sizes. You can even buy them in bulk at a discounted price. I like to purchase youth shirts for my campers and a few adult sizes for myself and my teenage helpers!

Get the design for your DIY Summer Music Camp t-shirts in my shop.


Asking for Parent Feedback in Piano Lessons: A Simple Evaluation Tool 

Parent feedback tool piano lessons

As a piano teacher, you are continually assessing your students' progress: 

  • What do they already know? 
  • What skills are they working on? 
  • Where do they need to go next? 

(If you don't yet have a tool in place to monitor progress, check out my free lesson planning article and template!) 

Taking time to periodically review big picture goals and reflect on where students are in relation to your goals is an important part of the teaching process. But sometimes you need another perspective. How are things really going in their daily at-home practice? Are there struggles (musical, motivational, or otherwise) that you are not aware of? Does the music interest your students or do they wish they could move on to more/less challenging, faster/slower, more classical/jazzier music? You may pick up on some things, but it can be helpful to hear more specifically from home.

Midway through the school year I reach out to parents to ask how they think piano lessons are going. I send an email asking for their feedback on a one-page form to be returned at the next lesson or scanned and emailed back to me. Of course, when parents drop off or pick up their children from lessons, or if they sit in and listen - these are moments when we can have a brief discussion about what their child recently accomplished or what my goals are for the coming week. But giving them a document to fill out is a nice, more formal, way to offer parents an opportunity to reflect on how their child is doing. Having to actually turn something in causes them to stop and think about what really is happening at home with practice, and they appreciate being invited to share their opinion on what is going on. Of course, you have to be open to criticism and willing to reflect on your own teaching practices and expectations if this is to be a productive exercise! But I encourage you to do it.

Parents have a unique perspective on their children's progress. They are the ones who live with your student, enforce (or don't enforce) practice, pay for your lessons, and know the child in ways that you do not. Their comments can help you see what is happening “behind the scenes” and give you insight on what you might do to help improve or continue to encourage progress. 

You're welcome to use the same feedback form that I use! You can find it here.

Be open to accepting feedback from others. It is easy to get defensive and think our way is best, but the mark of a good teacher is the flexibility to adapt to the changing needs of students - and this requires a willingness to hear from others and evaluate what we are doing in light of their comments. You don't have to change everything because someone else doesn't like what you are doing, but you can consider changing or adapting things if another approach might be more successful for a particular student.

What are some other ways that you reflect on your teaching? Do you have another way to elicit parent feedback that is working for you? Let me know in the comments!

Keep up with my writing by subscribing to At Home with Classical Piano on Substack.

What Does a Piano Camp Look Like? Free webinar March 7! 

What is a Piano Camp? Have you ever run one? Are you thinking you’d like to?

Piano Camp is much like any other day camp you might be familiar with – a Vacation Bible School, YMCA day camp, or musical theater camp. It is a group of kids coming together to have fun while learning! 

Piano Camp is an immersion in musical concepts related to the piano using fun games and activities. It could take the form of a half-day Saturday camp, a month-long one-hour-a-week camp, or a half day week-long camp. However you structure it, Piano Camp is a fun change from private lessons, an opportunity for kids to make music together in community, and a great way to teach and review music theory and history!

You can create your own materials or use ready-made curriculum. You may plan for existing piano students or decide to use the camp as a recruiting tool for new students. It may take the place of your private lessons in the summer, or you may use it to supplement your teaching.

Let me share how I run Piano Camps and then give you additional resources that will help you decide how you would like to tailor your camp(s)!

My student goals for Piano Camps are for students to 1) Have fun; 2) Review and solidify theory concepts; and 3) Be inspired to continue practicing. 

My personal goals for Piano Camps are to 1) Enjoy a lighter summer schedule; 2) Maintain a steady summer income; and 3) Have fun teaching my students in a different format.

I like to run a four-day camp, two hours each day, with teenage student helpers (most recently, my own kids!). Two hours is a nice duration – just long enough for a variety of activities and not so long as to have down time where the kids get bored and into trouble!

I like to have a variety of large and small motor activities (running/movement versus card games and workbooks), a teaching element, and clear opening and closing routines. Games and activities should be accessible to a range of ages and abilities, and there should be a “fun” factor that makes it feel more like camp than school!

Since I like to run camps in June, teach private lessons in July, and take the month of August off, I start talking about my summer plans in March with current piano students. I send out a survey to determine who is available and when, and open summer registration in April. I spend the next few months spreading the word, registering campers, and gathering the necessary materials. 

As you think about what your Piano Camp might look like, you will want to answer a few questions: Where and when do I want to hold a camp? What age range of students do I want to invite, and how many? What are my goals for the camp? How much do I want to charge? 

One good place to start thinking about these things is Jennifer Foxx’s Summer Camps Q&A (https://musiceducatorresources.com/2023/05/19/summer-camps-qa-music-teacher-tip-37/).

Another place is at my free 35-minute webinar on How to Run a Piano Camp being held Friday, March 7th, at 10am PST on Zoom. I will give an overview of what a camp might look like, share some planning resources, offer time for questions, and give you options of pre-made camps available for purchase. Register here to save your spot!

Running a Piano Camp is a great way to generate excitement around learning music and boosting interest in piano lessons. I hope you’ll give it a try!

Missed the webinar? Contact me to get on the waiting list for the next one!
 

Need a ready-made piano camp for your beginner students? I have two in my shop! Check out The Great Music Race and MSA: Musical Secret Agent.

Improve Your 4-Part Sightreading Skills 

If you want to improve your sightreading as a pianist, I often recommend Bach. The 2-part Inventions and the Preludes and Fugues from the Well-Tempered Clavier are great material for the mental (and physical!) gymnastics of sightreading independent voices.

If you regularly play for a choir, you may also be interested in improving your 4-part sightreading skills. Again, I recommend turning to Bach for some practice! Johann Sebastian Bach wrote numerous chorales as part of his cantatas, and they are an appropriate place to start if you want to work on reading SATB parts in differing combinations. For one thing, the chorales are hymn-like in their structure, and the parts usually move at the same time. This makes it easier to scan the notes to see if they make up recognizable chords. (A good bit of sightreading is intelligently predicting what comes next, and when we can predict with our ear where the harmonies are going, there is a good chance that our fingers will find their way, too!) The chorales are short, just one or two pages, which affords you time to look at the same piece through different voices, or different combinations of voices. And there are so many of them, that they give us plenty of material which with to work!

I have put together a free resource for improving your 4-part sightreading by looking at a chorale from Bach's St. Matthew's Passion that will take you step-by-step through identifying harmonies and practicing the different voice parts. Take a look at it and let me know what you think in the comments below!

Keep up with my writing by subscribing to At Home with Classical Piano on Substack.

Time-savers for Choral Accompanists + a Free PDF 

This is a repost from 2019, updated with a link to a printable PDF of tips - see below!
It’s the beginning of the season and you are handed a packet of music to learn by next week’s rehearsal. It’s like the first day of school. You feel all the emotions – excitement at new “school supplies,” anticipation of seeing choral friends after a long summer break, and readiness for new challenges. But with an hour’s worth (or more) of new music, where do you start? 

1. Prep the music. You likely were given a mix of piano-vocal scores, perhaps some zeroxed music (hopefully copyright-permissions-granted!), and maybe even an orchestral reduction of a major work in book-form. Ask permission to punch holes and otherwise mark up the music (in pencil!), and then put it into a black notebook. If your director has given you a program order, even better – put your music in concert order. If you have a book-type score, like Verdi’s Requiem or such work, decide whether you will take it to an office supply store to get the binding cut off and a spiral binding put on, or if you will fold and unfold the score to get the pages to lie flat. 

2. Listen to recordings of the music with the score. It’s tempting to dive right in and sight-read everything, but you will save time and unnecessary mistakes by listening with the score. Try finding the music on YouTube, Amazon Music, Spotify, iTunes, your library, or your own music collection. Listen for the overall “feel” of the piece. Mark tempo changes, dynamic changes, meter changes. Mark entrances in each voice part. Write in beats for difficult-to-count measures (in the accompaniment and in the vocal parts). 

3. Run through the music at the piano. At this point, you have a choice: You can start by reading through the accompaniment or by reading the vocal lines. Reading the accompaniment can give you a good feel for the harmonies and overall form; however, you may not play the full accompaniment until later in the season, depending on what level of singers you’re working with. If they will need a lot of part-plunking, don’t spend a lot of time learning the accompaniment at this point. It is important to become familiar with the voice parts, particularly entrances and harmonies. If it helps, write chord names above homophonic sections (especially if you are reading more than 4-part harmony, like in an 8-voice double choir piece). Mark entrances in each voice part so they are quickly spotted – either with a highlighter, or a circled note, or an arrow. 

If you are new at reading parts, try reading soprano + alto or tenor + bass and then expand your eyes to reading alto + tenor and soprano + bass. After reading two parts, expand to three. Another good exercise, particularly if you are going to lead a sectional, is to play the accompaniment while singing one voice part. This will draw your attention to hard-to-find entrances and tricky intervals. 

4. Mark your music.

a. Mark challenging sections with a post-it note or note them on a separate piece of paper and come back to them later. For the first and second read-throughs, you don’t want to spend too much time on nit-picking. Your goal is to get a feel for the overall arc of the piece, harmonies, and choral entrances. Everything else can come later. 

b. If the music indicates more parts than the standard SATB (like SSATB) and they are not marked after the initial measure, label each score. (This will save you headaches when you are asked to play the alto part and it’s on the third line down!) 

c. If the accompaniment is an orchestral reduction, listen for “the main thing.” What cues will the choir be listening for in performance? Mark these and prioritize them – leave other stuff out, if need be. Simplify, simplify, simplify.  Tremelos can become pulses or vice versa; groups of sixteenth notes can sometimes be simplified into eighths; octave runs can be simplified into single lines. Your goal is to provide support for the choir in the form of a solid harmonic foundation and a good knowledge of form – so that you can make music together in rehearsal as well as performance! The “frosting” is whatever color you can bring in from the orchestra part – the percussive drumming in the bass, or the piercing treble of the brass, or the pizzicato of the strings. As you listen to recordings over the season, start marking what instruments you hear in the score. Think about how you can accomplish the same feelings and colors at the piano in a pianistic way. Don’t try to play everything in the score! Reductions are often not written by pianists, and they should not be treated like a piano solo but as an approximation of color and timbre and feel. 

5. Take good notes. When in rehearsal, take note of places that need more practicing. Circle the places in your music, make a note on a separate piece of paper, or slap a post-it note on tricky places. When you return to the piano in private, work the hard spots first. 

6. Plan page turns. Later in the season, after you’ve gained some familiarity with the music, focus more on learning and polishing the accompaniment. Practice hard page turns. Write in the score where you want to turn and which hand will turn. Practice these turns. This may sound excessive, but it’s like writing in fingerings – If you will write in your planned fingering/page turn and practice it the same way each time, you will gain security in performance and will lessen your reliance on those “I hope this works out” moments. 

The more you accompany choirs, the more these steps will become intuitive. Listening first and marking your score well will help you learn a lot of music in a short amount of time. Much of our job as accompanists is “faking” – there is no way to learn such a vast repertoire unless you are good at finding shortcuts. This doesn’t mean sloppy playing; what it does mean is doing your homework efficiently and well. When you put in the time to prep, it will pay off in big ways: the choir will feel like you are listening to them (“You always play my entrances” or “You always seem to know where the altos need help”), the director will feel like you know the score, and you will play confidently and musically. Your reward? Another stack of music!

For a free printable PDF of these tips, click here!

Keep up with my writing by subscribing to At Home with Classical Piano on Substack.

Fun with Rhythm Playing Cards 

Are you a card player? I grew up in a family that loved playing cards. In fact, we have a family version of Gin Rummy that we call “Dummy Rummy” and we play it so often that my kids find it strange when they learn that their friends have no idea how to play!

A fun alternative to flashcard drills and theory worksheets in the music studio is playing various games with Rhythm Playing Cards. You can do so much with them! Here are a few ideas:

rhythm playing cards beginner piano game

Have students match cards of like value. Can they beat the teacher?

Have students arrange cards from lowest to highest value (or highest to lowest). Set a timer and see if they can beat their time!

Play Rhythm Playing Card Memory: Use two sets of cards and lay them on the floor face-down in a grid. One student turns over two cards; if they match, the student names the symbol and tells the value, and keeps the cards. If they don’t match, the student puts them back in the grid face-down and the next student (or the teacher) gets a turn. Whoever collects the most pairs wins!

  • Play Rhythm Playing Card War: The deck is divided evenly, with each player receiving half of the cards, dealt one at a time, face down. Each player places his stack of cards face down, in front of him. Each player turns up a card at the same time and the player with the higher note value card takes both cards and puts them, face down, on the bottom of his stack. If the cards are the same value, it is War. Each player puts two cards face down and one card face up. The player with the higher cards takes both piles (eight cards). If the turned-up cards are again the same value, each player places two more cards face down and turns another card face up. The player with the higher card takes all 14 cards, and so on. The game ends when one player has won all the cards. (A good rule of thumb is to use 40-50 cards per 2-3 players.)
  • Play Rhythm Playing Card I Spy: Lay out one of each rhythm symbol on the floor. Choose a card to describe to the other player without using the words “rest,” “beat,” “note,” or the name of the symbol.
  • Play Rhythm Playing Card Draw: Hold up one, two, or three rhythm symbols for three seconds, then put them face down. Challenge the student(s) to draw what they remember seeing.
  • Play Rhythm Playing Card Dictation: Choose four cards and clap the rhythm without showing the student(s). Can they correctly write down the rhythm you clapped? Now switch roles!
  • Decide on a time signature, and have students build four measures of rhythms. Challenge them to clap, stomp, hum, or chirp their rhythm!

Rhythm Playing Cards are incredibly versatile, and it is worth your time to print, laminate, and cut out a set to use in private and group lessons, summer camps, or even as a take-home activity for students to play with a sibling or parent! You can find a set in my shop that includes a printable PDF with quarter notes, quarter rests, half notes, half rests, eighth notes, eighth rests, whole notes, whole rests, dotted quarter notes, and dotted half notes. Print as many sets as you like for personal or studio use. (Click the picture for the link!) Please no distribution or resale.

Happy music-making!

Keep up with my writing by subscribing to At Home with Classical Piano on Substack.

Penguin Piano: Keyboard Geography Game 

build a keyboard geography beginner piano game

Beginner piano students need lots of varied practice with keyboard geography, and they can do it on and off the keys! I designed this game for a student of mine who is going on vacation for two weeks and will miss a couple of piano lessons in that time. In addition to some practice videos, I am sending him off with this game that can be played alone or with parent or siblings!

To play the game, download and print as many copies as you would like. Students assemble the black and white keys in the correct order, then place the letter-note penguins on the proper key. They self-correct using the included Answer Key. Make it a competition by printing multiple copies and racing to see who can complete their keyboard with penguins first! Or, make it a challenge by printing a whole piano keyboard worth of keys and penguins, and have your student build it in a specified amount of time!

build a keyboard geography beginner piano game

Find the game in my shop!

Happy music making!

Keep up with my writing by subscribing to At Home with Classical Piano on Substack.
Note Reading Games 

After you have introduced note names, it is time to practice! Flashcards are a good start, but how about a new game with a SURPRISE element?

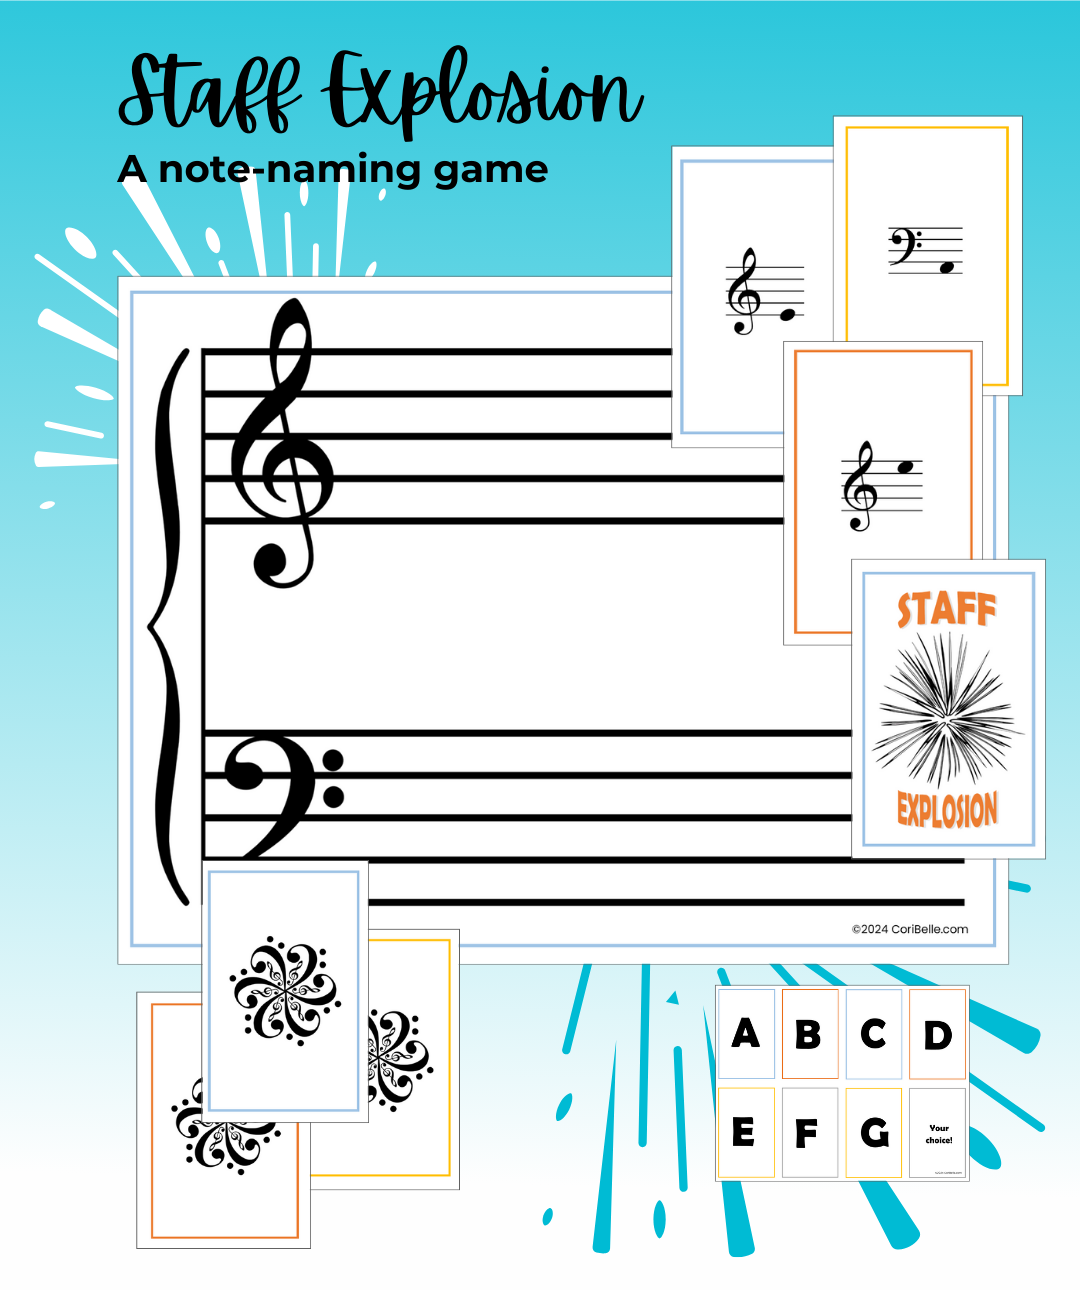
Staff Explosion is a brand new game that helps you teach and review note names in the order YOU choose. Do you like to start with landmark notes and their neighbors? Just print those cards! Do you like to teach FACE, All Cows Eat Grass, or other acronyms? Print the space or line notes that your student is working on and play with those cards. Ready for ledger lines? It’s got those, too!

beginner note name piano game on staff

I played this game in my Piano Party (a.k.a. Group Lesson) this month with mixed ages, both beginner and intermediate level students, and they loved it! We focused on just the bass clef notes this time, and by the end of the game the students were becoming more automatic in their recognition of note names!

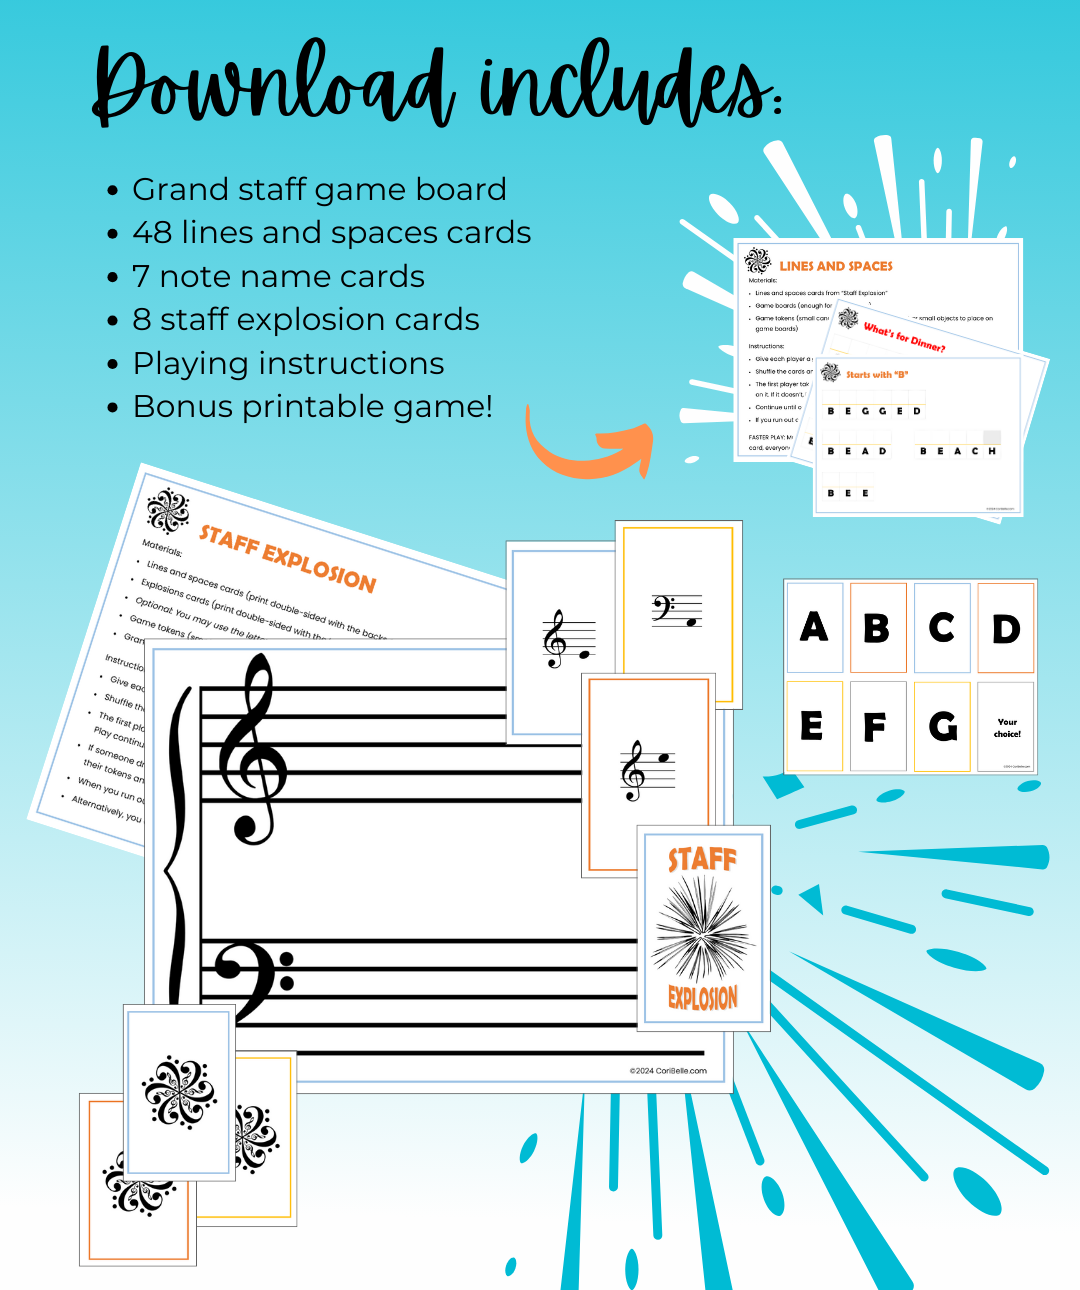
This digital download comes with all kinds of goodies: 48 line and space note cards, 7 staff EXPLOSION cards, and even 7 letter name cards if you want to have students begin with “A, B, C, D, E, F, or G” and find the notes’ positions on the staff without any visual help!

I have also included a BONUS game called Lines and Spaces that uses the same cards, but different game boards. In Lines and Spaces, students have to complete words using the musical alphabet. They will think it great fun to spell words like “cabbage” and “beef”!

beginner note name piano game on staff

You will receive all materials for both games, including instructions and a hint for faster play with Lines and Spaces. The games come in PDF form as a digital download, and you can reproduce the materials as many times as you want for your personal studio use.

Here is the link to get yours! Let me know how you use it in your studio!

Happy music-making!

Keep up with my writing by subscribing to At Home with Classical Piano on Substack.

Piano Lesson Planning 

piano lesson plan template

How many times do you finish teaching lessons, only to sit down to plan for next week – and you have forgotten what each student is working on?! I am always looking for ways to work smarter, not harder. Being a mom and having many different things going on requires that I am efficient with my time. When it comes to planning for piano lessons, I use a simple template to help me organize my thoughts.

The template shows three things:

  1. What the student is currently working on
  2. What concepts I am introducing
  3. What we need to work on next week

WHAT THE STUDENT IS CURRENTLY WORKING ON

I use this space during the lesson to jot down concepts/skills that the student is currently working to master: note names, a specific technique (two-note trills, octave jumps, correct hand position, wrist rotation), a specific chord progression, or even the page number of the method book they are in for reference later.

WHAT CONCEPTS I AM INTRODUCING

It is helpful to have a record of when I have introduced a concept, so that if a student has difficulty over several weeks mastering it, I can look back and see when they began working on it. I also jot this down during the lesson.

Related…If I know when the concept has been introduced, then I can see how we have tackled learning it in the “currently working on” notes. Maybe it is time to change my approach and try a new way of looking at the concept.

WHAT WE NEED TO WORK ON NEXT WEEK

The best time for me to plan what we need to do next time is during today’s lesson. It takes only a few seconds to jot down what our focus needs to be, or what book/piece we need to start on next time. I can also write down “end lesson early” or “email parent” if there is an issue that needs to be addressed.

By consciously taking a few seconds during each lesson to jot down notes, I make it easier for me to track progress, identify where students are getting stuck, and get a head start on next week’s lessons. When I am finished teaching for the day, or when I have space later in the week to sit down and consider what I need to prep for next week’s lessons, I have a reference point from which to draw ideas. Or, if my notes are clear and to the point, often nothing else is needed planning-wise, and I can move on with other tasks!

Click below for the FREE Piano Lesson Planning Template!
 
Keep up with my writing by subscribing to At Home with Classical Piano on Substack.

Time-savers for Choral Accompanists 


It’s the beginning of the season and you are handed a packet of music to learn by next week’s rehearsal. It’s like the first day of school. You feel all the emotions – excitement at new “school supplies,” anticipation of seeing choral friends after a long summer break, and readiness for new challenges. But with an hour’s worth (or more) of new music, where do you start? 

1. Prep the music. You likely were given a mix of piano-vocal scores, perhaps some zeroxed music (hopefully copyright-permissions-granted!), and maybe even an orchestral reduction of a major work in book-form. Ask permission to punch holes and otherwise mark up the music (in pencil!), and then put it into a black notebook. If your director has given you a program order, even better – put your music in concert order. If you have a book-type score, like Verdi’s Requiem or such work, decide whether you will take it to an office supply store to get the binding cut off and a spiral binding put on, or if you will fold and unfold the score to get the pages to lie flat. 

2. Listen to recordings of the music with the score. It’s tempting to dive right in and sight-read everything, but you will save time and unnecessary mistakes by listening with the score. Try finding the music on YouTube, Amazon Music, Spotify, iTunes, your library, or your own music collection. Listen for the overall “feel” of the piece. Mark tempo changes, dynamic changes, meter changes. Mark entrances in each voice part. Write in beats for difficult-to-count measures (in the accompaniment and in the vocal parts). 

3. Run through the music at the piano. At this point, you have a choice: You can start by reading through the accompaniment or by reading the vocal lines. Reading the accompaniment can give you a good feel for the harmonies and overall form; however, you may not play the full accompaniment until later in the season, depending on what level of singers you’re working with. If they will need a lot of part-plunking, don’t spend a lot of time learning the accompaniment at this point. It is important to become familiar with the voice parts, particularly entrances and harmonies. If it helps, write chord names above homophonic sections (especially if you are reading more than 4-part harmony, like in an 8-voice double choir piece). Mark entrances in each voice part so they are quickly spotted – either with a highlighter, or a circled note, or an arrow. 

If you are new at reading parts, try reading soprano + alto or tenor + bass and then expand your eyes to reading alto + tenor and soprano + bass. After reading two parts, expand to three. Another good exercise, particularly if you are going to lead a sectional, is to play the accompaniment while singing one voice part. This will draw your attention to hard-to-find entrances and tricky intervals. 

4. Mark your music 

a. Mark challenging sections with a post-it note or note them on a separate piece of paper and come back to them later. For the first and second read-throughs, you don’t want to spend too much time on nit-picking. Your goal is to get a feel for the overall arc of the piece, harmonies, and choral entrances. Everything else can come later. 

b. If the music indicates more parts than the standard SATB (like SSATB) and they are not marked after the initial measure, label each score. (This will save you headaches when you are asked to play the alto part and it’s on the third line down!) 

c. If the accompaniment is an orchestral reduction, listen for “the main thing.” What cues will the choir be listening for in performance? Mark these and prioritize them – leave other stuff out, if need be. Simplify, simplify, simplify.  Tremelos can become pulses or vice versa; groups of sixteenth notes can sometimes be simplified into eighths; octave runs can be simplified into single lines. Your goal is to provide support for the choir in the form of a solid harmonic foundation and a good knowledge of form – so that you can make music together in rehearsal as well as performance! The “frosting” is whatever color you can bring in from the orchestra part – the percussive drumming in the bass, or the piercing treble of the brass, or the pizzicato of the strings. As you listen to recordings over the season, start marking what instruments you hear in the score. Think about how you can accomplish the same feelings and colors at the piano in a pianistic way. Don’t try to play everything in the score! Reductions are often not written by pianists, and they should not be treated like a piano solo but as an approximation of color and timbre and feel. 

5. Take good notes. When in rehearsal, take note of places that need more practicing. Circle the places in your music, make a note on a separate piece of paper, or slap a post-it note on tricky places. When you return to the piano in private, work the hard spots first. 

6. Plan page turns. Later in the season, after you’ve gained some familiarity with the music, focus more on learning and polishing the accompaniment. Practice hard page turns. Write in the score where you want to turn and which hand will turn. Practice these turns. This may sound excessive, but it’s like writing in fingerings – If you will write in your planned fingering/page turn and practice it the same way each time, you will gain security in performance and will lessen your reliance on those “I hope this works out” moments. 

The more you accompany choirs, the more these steps will become intuitive. Listening first and marking your score well will help you learn a lot of music in a short amount of time. Much of our job as accompanists is “faking” – there is no way to learn such a vast repertoire unless you are good at finding shortcuts. This doesn’t mean sloppy playing; what it does mean is doing your homework efficiently and well. When you put in the time to prep, it will pay off in big ways: the choir will feel like you are listening to them (“You always play my entrances” or “You always seem to know where the altos need help”), the director will feel like you know the score, and you will play confidently and musically. Your reward? Another stack of music!

For a free printable PDF of these tips, click here!

Keep up with my writing by subscribing to At Home with Classical Piano on Substack.