Viewing: Piano teaching - View all posts

Organizing Piano Student Binders 

This post first had its home on my substack, At Home with Classical Piano, which is where I write regularly now. Come join me there, or subscribe to my newsletter to stay in the loop and get posts delivered straight to your inbox!

It’s August…and that means school is just around the corner! And that means, it’s time to go school shopping again!

As you are getting ready to welcome piano students back into your studio this fall, I want to remind you of some resources in my shop that can help you get organized!

I give a one-inch, white, three-ring binder to each student. In the front of the binder, I slip Piano-opoly into the plastic sleeve. We use Piano-opoly to track progress - anything from completing a scale exercise correctly, to completing a song, to finishing a theory page. When students reach a square that says “prize,” they get to choose something from my prize box! Some of their favorites include:

Bouncy balls

Colorful music pens

Treble clef pencils

Puffy monster keychains

Mophead ballpoint pens

Brain teaser marble puzzles

Cute animal sticky notepads

Football fidget spinners

Fruity mechanical pencils

We keep track of their assignments on the Piano Tracker, where I write in detail what I want them to practice each week and students mark an X for each day of practice.

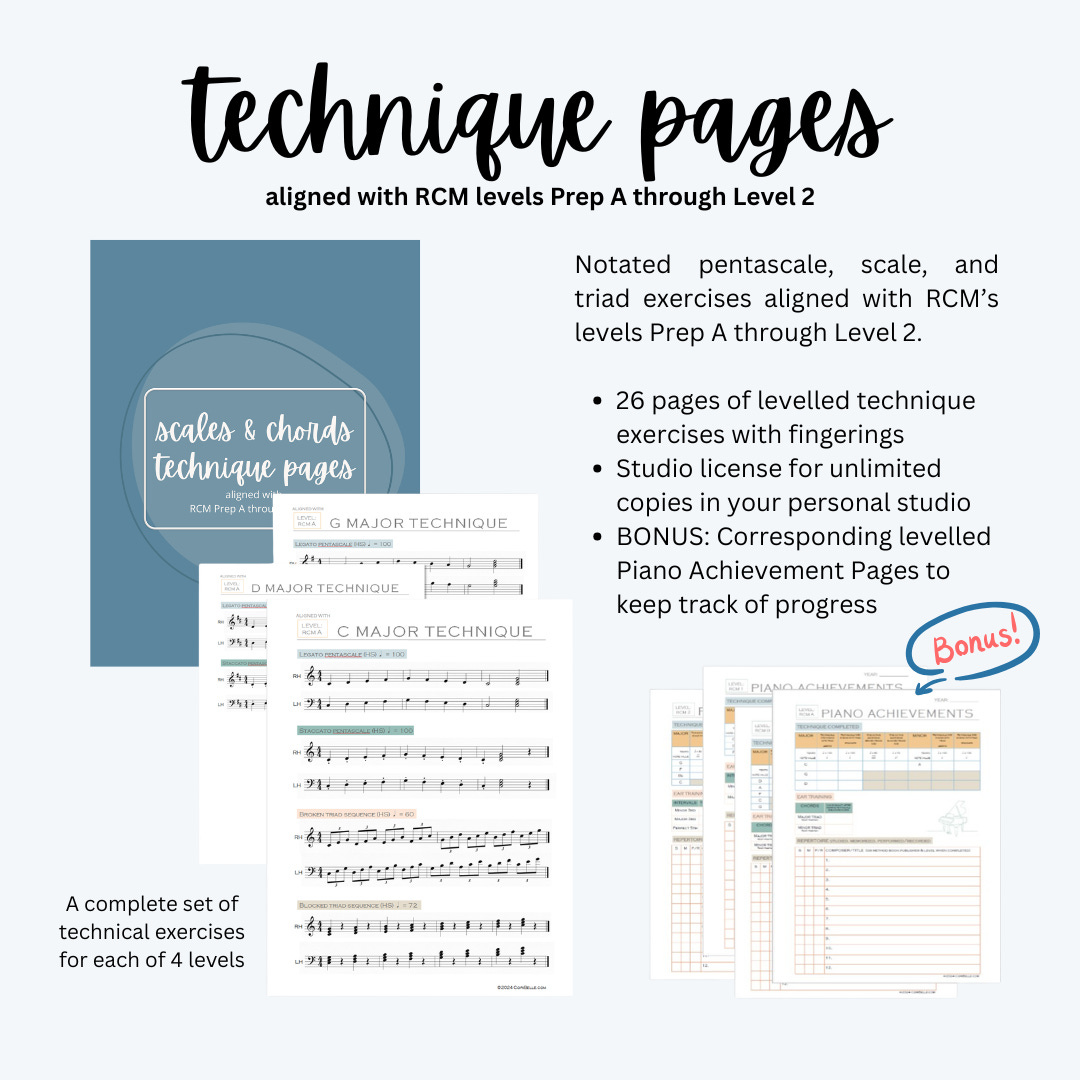
Students can see the progress they are making in technique and repertoire on their Piano Achievement page, which is aligned with the Royal Conservatory of Music levels. I use RCM’s technique requirements to guide students in a progressive study of scales and chords. I’m excited to announce that in addition to the achievement pages, I now offer corresponding technique pages for the first four levels (Prep A to Level 2) in my shop!

The technique pages make it easy for students to see exactly what they are to practice, with which fingering, in order to complete their technique requirements. If you already own the Piano Achievement pages, you’ll want to check these out!

I use colored tabs with labels to keep everything organized. I also keep my Studio Calendar and Studio Policy in plastic page protectors right after their Piano Tracker and before the tabs, for easy reference. Finally, I slip a Suggestions on How to Practice sheet in the back cover of the binder as a reminder for students.

You can watch a quick video of how everything is put together here.

The Piano Binders serve as a growing library of musical information for students as well as a place to house their assignments. The binders grow with the students and are a physical reminder of the hard work they put into practicing and music study, forming a portfolio of sorts that celebrates their achievements!

Many of the resources I mentioned above are free in my shop! Check them out!

Disclosure: As an Amazon Associate I earn from qualifying purchases. This means if you click on a link and make a purchase, I may receive a small commission. This commission comes at no additional cost to you and helps to support my music.

Free Piano Sheet Music Resources 

This post first had its home on my substack, At Home with Classical Piano, which is where I write regularly now. Come join me there, or subscribe to my newsletter to stay in the loop and get posts delivered straight to your inbox!

Whether you are a piano teacher looking for music for your students, or a pianist looking for something new to study or play for an upcoming performance, there are a growing number of resources for free music on the Internet. Generally, “free” music falls under the auspices of what is in the public domain - music that is out of copyright because it meets your country’s requirements for X years past the publication date. However, there are some generous folks who have made their arrangements for beginner-intermediate students available for free download. Below are some of my favorite resources:

Chrissy Ricker has a number of pre-reading and elementary arrangements, as well as a few intermediate selections on her Free Stuff page. You’ll also find quite a few teaching resources on the page as well! (And if you would like to support her work financially, check out her music on PopMusicPlus which has fabulous arrangements of popular songs at every level.)

Gilbert DeBenedetti generously offers his arrangements of classical music and folk tunes, as well as some original tunes, on his site, G major theory. Browse by level.

Making Music Fun is a wonderful place to find music history resources. Did you know you can also download their free sheet music arrangements? Browse by classical, patriotic, Christian, jazz, Christmas, celtic, or nursery rhyme categories, or find by level (1-5).

And, of course, everyone should know of the Petrucci Music Library, where you can find a huge assortment of classical music in the public domain. Search by composer, nationality, time period, or instrument difficulty (Piano levels are ordered by the RCM levelling system, which generally starts at year 2-3 of piano study. No pre-reading music here.).

Choral pianists and conductors in search of choral-only music can check out the Choral Wiki, where you can search by voice part. If you’re looking to strengthen your open score sightreading skills, this could be a great resource for you.

Recently, I took advantage of several of these websites as I am preparing summer music for my students. I always like to have something a little out of our “norm” for the summer to keep things fun!

What is your go-to resource for sheet music? Do you take advantage of any of these free resources, pay for a monthly subscription for access, or write your own? Let me know in the comments.

Why Piano Teachers Should Consider Running a Summer Camp This Year 

This post first had its home on my new substack, At Home with Classical Piano, which is where I write regularly now. Come join me there, or subscribe to my newsletter to stay in the loop and get posts delivered straight to your inbox!

This is the time of year when I start thinking about what I want summer to look like—for me and for my students. If you’re a piano teacher, you’re probably starting to think about that, too!

Summer offers a natural change of pace—a chance to mix things up, take a little time off, or do things differently than you do during the school year. However, it can also be a season when income takes a hit, especially if your studio follows a traditional school schedule. Planning ahead now can help you so that you’re not scrambling come June.

If you love to teach groups of kids, have the space to host 4-10 kids, and want to either recruit new students or offer a fun alternative to lessons for current students, consider offering a summer camp!

Here are a few things I love about camps:

Camps Build Community

Camps give piano students, who usually learn in isolation, an opportunity to learn together, laugh together, and make music together. They discover that rhythm games are more fun with friends, composing is easier when ideas bounce around the room, and music is something to be shared.

Camps Attract New Students (and Re‑Engage Current Ones)

Summer is a natural time for families to explore new activities. A camp is a low‑commitment, high‑interest way for new students to meet you, experience your teaching style, and get excited about music. It’s a natural recruiting tool!

It’s also a wonderful way to re‑energize current students who need a little inspiration. A week of hands‑on activities, games, and creative projects can spark motivation that carries into fall lessons.

Camps Give You Flexibility

Some practical benefits of running a camp are that it allows you to:

  • Replace or supplement summer lesson income
  • Consolidate teaching hours into a few focused days
  • Free up the rest of your summer for rest, travel, or creative work

For the price of a month of lessons, students get to participate in a fun music camp “intensive” —and you get the benefit of teaching multiple students at once.

Camps Let You Teach Musicianship in New Ways

Explore rhythm through movement, composition through storytelling, listening skills through group games, and theory through hands‑on activities. Students absorb concepts differently when they’re immersed in a sensory camp experience…and they’ll remember the fun they had when the bullfrog visited them during an outside theory game!

But… Planning a Camp Can Feel Overwhelming

The questions pile up quickly:

  • What kind of camp should I run?
  • How many students should I plan for?
  • How long should it be?
  • Should I use an existing curriculum or create my own?
  • How do I structure each day?
  • What should I charge?
  • When do I start marketing?

So many decisions can be overwhelming.

That’s why I put together a planning workshop for you!

How to Run a Summer Camp: A Planning Workshop for Piano Teachers

In this on-demand workshop, I’ll walk you through:

  • Choosing the right type of camp for your studio
  • Deciding on length, structure, pacing, and group size
  • Reviewing the best camp curriculums available for piano teachers
  • Tips for writing your own curriculum (if you want to!)
  • Pricing, marketing, and registration strategies
  • A planning timeline to keep you on track
  • Sample emails and registration form

You’ll leave with a clear plan of action for this year’s camp—plus a planning guide with all the resources you need to get started.

Summer camps have been a fun way to supplement my private piano teaching and keep students engaged. If you’ve ever thought about running one—or even if you’re just curious—I would love to help you get started.

Ready to plan your camp?

👉 Click here to access the workshop. 

I can’t wait to see what you create this summer!

Happy music-making!
Cori

P.S. For more ideas on how to boost your summer income, check out this link.

The Music Learning Process: Zoom in, Zoom out, Repeat 

This post first had its home on my new substack, At Home with Classical Piano, which is where I write regularly now. Come join me there, or subscribe to my newsletter to stay in the loop and get posts delivered straight to your inbox!

I have slowly been making my way through Ravel’s Jeux d’eau. You may know the piece from the 2024 Olympics, when it was played in the opening ceremonies by pianist Alexandre Kantorow on a grand piano in pouring rain.

The picture makes me cringe – what an awful way to treat a beautiful instrument! However, the image of rain falling on the very instrument whose music simulates the movement of water is incredibly effective. My shock and awe at this sight drove me to explore the piece myself a few months later.

Let me start by saying that this is a difficult piece to learn! It is not straightforward like Mozart, where the notes fit neatly into their appointed beats and the melody is often clearly delineated in the right hand. Instead, Ravel seeks to create an impression of the different ways in which water moves.

In the Pacific Northwest, we are very familiar with water, specifically rain! Our rain comes in all shapes and sizes: fine mist that you barely see, steady unrelenting rain lasting weeks on end, quick torrential downpours, light pitter-patter drops that evolve into unexpected hailstorms. And then there are the rivers, lakes, ocean...and the waterfalls that barely drip with water in the summer’s heat but cascade violently during winter storms. Think of the millions of tiny water droplets that make up all these expressions of water and then imagine translating them into ink by giving a toddler a ballpoint pen with the instruction to “cover the paper with dots.” This is what the music looks like. How do you even make sense of it all?! My process with this, and all new pieces of music, tends to look like this:

1. Get an overview – listen with and without the score, muddle through a first reading

2. Analyze sections to identify patterns, work out chunks

3. Practice note by note, taking it apart hands separately, and write out the beats where necessary

Zoom in, zoom out and repeat. Even though I may start this process by going through steps one, two and three consecutively, I am constantly revisiting one or the other of the steps as I work towards mastery. I can never stay in one step exclusively or I hinder my own progress.

When presenting a new piece to a student for the first time, we make choices about how we will teach it: play it first for them; talk through it and analyze what is happening; or let them muddle through without any assistance. All three approaches accomplish different goals, and all three approaches are needed throughout the student’s time of study with us.

When we approach a new piece ourselves, we also make choices about how we will begin learning it. It is important to get an overview of it at some point (some may argue that this is an essential first step), perhaps by listening to a recording or muddling through a first reading. The latter is almost impossible to do in the Ravel, as parts are just not readable at first glance. Nonetheless, it is important to have an idea of how the piece is laid out and what Ravel is trying to communicate.

Analysis can get us a long way, as we study the piece first for an initial theme and begin noting sections that vary from, or repeat, the theme. We look for key changes, tempo changes, and register changes. We might even mark our music before we ever begin playing, identifying an ABA form or writing in names of notes or chords that are difficult to read (multiple ledger lines, for instance, or passages with double sharps!).

Practicing note by note, hands separately, slowly and methodically is also an important strategy, but it can be easy to “miss the forest for the trees.” In other words, we can get too focused in on the minutiae that we lose the whole arc of the piece if we stay in this mode too long.

Our practice must constantly be a process of zooming in and zooming out. Similarly, we need to teach our students to have a sense of the whole (This is usually not a problem, as students like to power through to the end, despite making numerous mistakes, or playing haltingly as they struggle to figure out notes in the midst of “getting through”) and to attend to small sections that need troubleshooting. This is why “play your piece three times a day” or “practice for 30 minutes a day” is not sufficient instruction. We need to spend time during the lesson demonstrating how to look at the big picture and identify sections (zooming out), and then in writing in fingering and practicing short bits in a focused and detailed manner (zooming in) so that our students learn effective ways to practice.

One fun way I like to “zoom out” when students are getting lost in practicing short bits is by taking them to the last four measures of a piece and teaching them the section. We then discuss working backwards as a practice strategy: now that they know the last four bars, they can learn the few bars before those and play to the end, feeling a sense of accomplishment!

If you play for a choir, you know that practicing choral music often demands a quick, efficient approach. This is where analysis is most beneficial to begin with, then muddling through the whole piece (identifying shortcuts), and working note by note only at crucial points. If you are interested in learning more about this approach, you can check out my Open Score reading workshop.

Practicing does not have to be a chore; it can be an enjoyable process of problem-solving and discovery when we learn to zoom in and zoom out, taking advantage of our time and energy by working hard on details in short, focused bursts, and then rewarding ourselves with the chance to play what we know and have already mastered – or listening to the music with our score and taking note of what another pianist does to make it musical.

Which of these three phases of music learning do you enjoy most? Do you tend to spend your time in [teaching or practicing] one phase more than the other two? I didn’t even speak to the topic of memorizing - is that a part of your learning process? Let me know in the comments!

This post was originally published on my Substack, where you can find my latest posts, Practice Sessions, and Mini Musikhaus recordings. To have content delivered straight to your inbox, sign up for my Newsletter.

Teaching Piano Students How to Listen 

"Tell me about what you just played. Did you include the dynamics?"

"I don't know."

Have you had a similar exchange in your studio? This is all too common with my students. They play for me; I make some comments, praising them for what they did well and addressing one or two things that need work; and then they try again. Then they look to me for my approval. 

But I don't want them to always look to me; I want them to notice if they have accomplished what they set out to do. I want them to listen.

My goal in piano teaching is to create independent learners. I want my students to play well technically and express themselves musically, but I also want them to eventually be able to learn music on their own. In order to do this, I will need to spend a number of years with them building up their technical, musical, and reading skills. I also need to teach them to listen.

How is this accomplished?

When students first come to us, their movements are often crude and unrefined, and they are so intent on pushing the keys that they forget to listen. But that doesn't mean they can't be taught! This is why we begin teaching them how to count, drawing their attention to when notes move higher or lower - aurally and visually and kinesthetically. It is why we teach dynamics and the difference between staccato and legato playing. As they grow, we talk about phrasing and making the music sound like a conversation, or a story. We introduce concepts like rubato.

We  need to teach students to pay attention to what they are doing at the piano.

One thing we can do to help our students begin listening to themselves is to have them play through a piece once, working out movements and fingerings, and then ask them to play it a second time with dynamics (or articulation, or whatever it is you want them to attend to). The physical won't always be isolated in practice, but it is often this way when we approach a new piece.

We can't toss out body mechanics. Students still need to move their fingers, control the force of their arm weight, and so on. And so much of their work in learning to play the piano is focused on controlling their movements. But as they work out technical difficulties, they ought also attend to the sound.

I remember learning in this fashion for many years - practicing to master playing the instrument with each new piece I was given - and then my teacher would start asking me to "add expression."

As pianists, our goal should always be to play musically. The movements our bodies make are just a means to an end. If we, or our students, can play all of the correct notes but lack any shaping of the phrase, articulation, dynamics, or rubato, what are we doing?

I like to tell my students that the piano is a musical instrument, not a computer! 

Pressing the right keys doesn't make music. Shaping the sound with the way we move, breathing between phrases, listening to how notes rise and fall, and making adjustments to the tempo and dynamics does!

Here are some things we can do to train our students to listen so that they can become musicians at the keyboard, not merely piano "players":

1. Demonstrate what we want them to do. Have the student sit in your "teacher chair" while you play. Talk about what you are doing. Then, have the student try to imitate your playing. Praise their efforts. Discuss how they can manipulate their movements to achieve a certain sound.

2. Record the student and play it back to them. Tell them what to listen for. When students are physically removed from making the sound, they can listen more intently.

3. Play recordings of other pianists, either audio or video, for your students and encourage them to listen for a specific thing each time.

As students mature and become more self-aware (and better listeners), they will develop the ability to play more musically. Their desire to make music will grow, and they will begin self-correcting their mistakes and adjusting their movements to create the kind of sound they want to hear. 

As you welcome students to lessons this week, consider how you can encourage them to be better listeners as they play!

Keep up with my writing by subscribing to At Home with Classical Piano on Substack.

Why You Should Play Duets with Your Piano Students 

  1. Duets are fun! As one of my young beginners said once, “It sounds better when we play together.” A duet can help the simplest beginning song sound like “real music,” and even our youngest students need to experience making beautiful music!  I love mixing things up once in awhile and starting a lesson by playing a duet with a student. 
  2.  
  3. Here are some reasons why playing duets with our students can be really beneficial:
  • Duets are one way to teach steady beat. We can clap, count, march, and tap until we are blue in the face (and sometimes we do!), and still we have students who need more practice with this concept. Duets are one tool we can use to help keep the beat as our students play, and as we play together more often, the experience can help our students start to internalize a steady pulse.
  • Duets strengthen the teacher-student bond. We all want to connect with our students, to form a relationship of trust and respect so that the teaching-learning exchange is profitable and enjoyable. When we sit beside our students and play duets, we create a shared experience where for a moment we are musicians together.
  • Duets are a great way to practice sightreading. Some students will naturally read every piece of music they can get their hands on. Others need a little encouragement. Find pieces that are a level or two below the student’s playing level, and read them together as a duet at a moderate tempo. Help the student be successful by previewing the score together, discussing where there might be unexpected rhythms, leaps, or key changes. Then, set the tempo and play!

If you are using a method book series like Faber and Faber, Alfred, or Bastien, you will find teacher duets written in the lesson book for many of the student’s songs. These are great to play with beginners after the student has mastered playing their part.

For students who have been taking lessons for a few years, Margaret Goldston has some fun elementary level duets that are great for sightreading. Try “Duets for Bear Lovers,” “Duets for Cat Lovers,” or “Duets for Dog Lovers.” (I just learned that she also has three books of “Duets for Christmas Lovers!”) Goldston’s books feature primo and secondo parts of equal difficulty, and it can be fun to take turns playing each part with your students.

You might also try Helen Marlais’ “In Recital Series” of duet books published by Alfred Music. 

A fun book for intermediate and advanced students is The Rodgers and Hammerstein Piano Duet Book arranged by Walter Pels and David Carr Glover. (You may have to find this one as a used copy!) Depending on your student’s sightreading ability, you may prefer to assign pieces in this book for the student to study at home before playing together.

At the advanced level, students may enjoy Faure’s Dolly Suite, Dvorzak’s Slavic Dances, Compton’s C.S. (Chopsticks) Theme and Variations, or any of a number of wonderful pieces for four hands.

What are some of your favorite duets to play with students? Let me know in the comments!

Keep up with my writing by subscribing to At Home with Classical Piano on Substack.

The 3 Stages of Piano Teaching: From Survival to Student-Centered Success 

whirling leaves

I was teaching out of one of the Faber Piano Adventure books the other day and came across “Whirling Leaves,” which I have taught many times before. Something about seeing it again reminded me of my first time trying to teach it to a student, and the ensuing struggles to master the rhythm. 

The piece is not that difficult: a left-hand accompaniment pattern that repeats, beginning by itself and then gradually bringing in a simple right-hand melody over the top. But inevitably kids get the counting wrong the first time they read it, and by doing so they establish a [bad] habit of playing the incorrect rhythm every single time

An experienced teacher knows this about this particular piece and will “frontload” the student with information to make the first reading a success: Play the piece for the student so he can learn how it is supposed to sound; count and clap the rhythm together; have the student write in the beats; practice playing just the left hand and counting aloud until the rhythm is mastered. But a beginning teacher does not always anticipate what challenges a particular curriculum/piece of music might present, especially to a student who lacks the background knowledge needed to be successful. Further, a beginning teacher often has limited strategies for addressing challenges as they come up.

Are you aware of the different stages of teaching we go through, the normal path of growth and development for a teacher? When I went through my teacher training to become a certified public-school teacher, I learned that there are three stages every new teacher goes through (whether new to the profession or new to a particular grade level or curriculum):

  1. Teaching with a focus on me – How do I get through the day? What am I supposed to be doing? What are others thinking about me?
  2. Teaching with a focus on the curriculum – What am I teaching? How can I adequately explain what needs to be taught?
  3. Teaching with a focus on the child – What does the child need? Is my instruction reaching him? What does she understand, and where is she still struggling? How can I adapt to meet his learning needs?

Each stage can take a year or so to move through, through no fault of the teacher. It is just how things tend to work! 

Which of the above stages do you most identify with currently? 

If you’re at #1: Be encouraged, knowing that all of us start at this stage! Rather than feeling self-conscious about your teaching, be assured that you have something to offer. Be willing to learn from your mistakes. As you approach each lesson, review what the student already knows and build on that foundation. If things aren’t working, don’t be afraid to stay with a piece for a few weeks, or even to review old pieces to solidify concepts. Try different things. Reach out to a colleague if you’re not sure what to try. Know that as time goes on, you will refine your teaching and hone your skillset.

If you’re at #2: You’re starting to think more strategically about content. Lean into this time! Research best practices in teaching. Take a pedagogy class, listen to podcasts, follow a blogger. Choose a method and stick with it; learn its strengths and weaknesses and supplement where you need to. Although not strictly related to pedagogy, you might find some helpful resources in my article on Professional Development for Pianists.

If you are at #3: You’re comfortable with your teaching materials (method, anthologies, technique) and ready to really consider how to address specific needs of students. Be intentional about finding music that both highlights their strengths and challenges them to grow. At least once a year, reflect on where each student has been and where you would like them to go. Check in with parents to give and receive feedback on lessons and practice. Experiment with different ways of explaining the same concept. Join a good piano teacher group on Facebook and participate in the discussions, use the search function within the group to explore specific topics, and be open to learning new ways to teach effectively. Some well-moderated groups include Professional Piano Teachers, The Art of Piano Pedagogy, and Piano Teacher Central.

Wherever you are at in your teaching journey, I hope you are enjoying the process of discovery and growth – both in your students and in yourself! I don’t think any of us ever “arrive,” but we can definitely refine our skillset and become better communicators and educators if we are willing to commit to a lifetime of learning!

I am offering a mini-course this fall on When the Method Book is Not Enough, all about evaluating the curriculum you're using and how it fits your particular students' needs. We will discuss ways to supplement your current method books or transition out of them altogether. My goal is to give you a better understanding of what method books can and cannot accomplish as well as an assortment of tools and resources to curate the best books for motivating and engaging your students. If this topic interests you, click here!

Keep up with my writing by subscribing to At Home with Classical Piano on Substack.

What an Intermediate Piano Lesson Looks Like in My Studio 

The Intermediate stage of piano lessons is quite variable. It can range from 3-6 years, or even more, of study, and spans a wide range of repertoire. For my purposes here, I will define it as the time beginning when a piano student has received 3-4 years of instruction, can comfortably sightread simple music hands together in C, F, G, and D major (and their relative minors), has an understanding of major intervals and primary triads, and has developed some independence in practicing at home, and extending to the time when the student has developed proficiency in a wide variety of literature and is ready to move on to advanced technical and interpretive challenges. Generally, the intermediate student has some fluency at the keyboard and is ready to begin working on more difficult music and exploring musical expression and interpretation rather than “just doing what the teacher says.”

I offer 45-minute lessons to Intermediate students, as 30 minutes is just not enough time to dive deeper into the music they are learning. My 45-minute lessons are generally structured in this way:

  • Technique (scales and chords from the Royal Conservatory of Music's program)
  • Repertoire - old and new, in various stages of progress
  • Theory - used to be RCM's resources, but this year I am loving Mark Sarnecki's Elementary Music Theory and Essential Music Theory books!

I often ask students what they want to start with. I like to give them the option of “showing off” what they have learned in a particular piece or jumping to something they really want help on. Other times, I will pull out a simple duet book and we will start a lesson by sightreading a duet or two together (SO FUN! And such good practice for these kiddos!) There are also times when I really want to make sure we address technique or theory, or a particular piece of music, and I will choose. But I like giving students autonomy over “what we do first” whenever I can.

Technique is so important for these students. I often get intermediate students who are transfers, and what is most often lacking is solid technique. So we discuss posture at the piano, using our whole bodies to play (not just the fingers!), proper hand position, and the importance of playing without tension. We address a lot of technique within the music itself, like wrist rotation and accomplishing “jumps” side-to-side rather than up-down, but I also want my students to be very familiar with major and minor scales and chords in every key. We talk about how learning the correct fingering for scales and chords in inversions and arpeggios gives us tools that will help our playing, because then when we see scale passages or arpeggios in a piece of music, our fingers already know where to go! Our students need to recognize these patterns in their music as they grow in their reading skills.

Repertoire is so varied in this group, but I do like having one book that forms our “core." For students who are interested in classical music, I'll use one of the Faber Piano Literature anthologies. (I also like the RCM Etude books as part of our “core.") For students who are interested in playing in a worship band at their church, I'll use Donna Gielow McFarland's Worship at the Keys, as well as music that their church is playing. The rest of their repertoire I choose based on their interests - a book on sonatinas, a fake book with lead sheets, Celtic music, hymn arrangements, musical theater anthologies, music by a favorite composer, and so forth. 

Students are often working on 3-5 pieces at a time. I like to assign one piece that can be learned and mastered in a week, another few that will take a little longer, and then a “stretch” piece. Additionally, if the student needs to have a lot of “quick wins,” I will choose pattern-based music like Juan Cabeza's Diversions. It is important that not everything is hard. Our students, just like us, need to have music that they can play easily for enjoyment as well as music that takes focus and discipline to master. Finding balance between the two is the sweet spot and the “secret” to motivating students to practice.

Beyond learning correct notes and rhythms, we also work a lot on expression - paying attention to the form of a piece, differentiating between repeated material, attending to articulation, breathing between phrases, developing beautiful singing lines, and so on. Sometimes we will work together to create a “story” narrative of a piece, to get the student thinking in terms of beginning, middle, end, or tension-resolution. I want my students to not only learn how to play the instrument, but also to learn to listen to themselves and really begin to “sing” at the keyboard. These things take time to develop, and usually begin by strict imitation of what I'm doing. Gradually, students begin to take risks and develop some ownership of their pieces. This is when lessons get really fun! 

Theory is another important component to lessons and the students' theory books give us an opportunity to discuss why music is notated the way it is. Music is an aural art, but to pass it on to a wide audience it needs to be written down. For a full comprehension of how music works and why, our students need theory and performance practice.

The intermediate stage of lessons can quickly become really fun or really hard. I find that with good music selection, giving students choices, and making sure they are able to have a “win” every week (a scale learned, an easy piece mastered, or a fun time playing a duet with me), students stay engaged and enjoy lessons. (And hopefully they enjoy some of their practice time at home, too!)

Let me know what you love about your intermediate lessons! What is still hard? Let me know in the comments.

Keep up with my writing by subscribing to At Home with Classical Piano on Substack.

Beginner Piano Lesson Games 

Playing games in the piano studio is a great way to introduce and review concepts, change the pace of a lesson, and have fun around music! 

I especially like working games into lessons with my younger beginner students: playing with animal erasers, getting off the bench and onto the floor, and sometimes introducing a wee bit of competition! (Watch this with your young ones, though - often a cooperative game will be a better choice for preschoolers.)

Some of the concepts beginners need help with are:

  • Left and right
  • Finger numbers
  • Musical alphabet
  • Names of the keys on the keyboard

Left and Right

First, establish how a student will tell their right hand from their left. Sometimes we refer to a student's hand as “the hand you write with” or “the hand you throw a ball with.” I like to have students put their hands in the air in front of them, facing out, and form an “L” in each hand using their thumbs and pointer fingers. Only the left hand will form a proper “L” for “left.”

Play a simple Simon Says game, where you call out directions and the student puts their left hand on their ear, or their right hand pats their shoulder, or their left hand touches their shoe, etc.

Finger Numbers

Do a simple “finger warm-up” where the student puts his hands in the air in front of him, and then you call out fingers to wiggle: “Wiggle your ones” (thumbs), “wiggle your twos,” and so forth.

Trace the student's hands on a piece of paper. Toss a pom pom, cotton ball, or penny on the paper, trying to land on a finger. Ask the student to name the hand (left/right) and the finger number that the object landed on. If you'd like, have the student label the finger number with a pencil. Continue playing until all fingers have been labelled.

Musical alphabet train game beginner piano

Musical Alphabet

Students can practice their musical alphabet forwards and backwards with this simple train game! Additionally, they can practice finding “what comes next” and “what comes before” when given two consecutive letters of the alphabet.

Names of Keys on the Keyboard

Animal rescue and race beginner piano game printable

Animal Rescue and Race is a set of two beginner piano games that teach keyboard geography and direction.

In Animal Race to the Top, students construct a paper keyboard on the floor and then choose letter cards to race animals from bottom (left) to the top (right) of the paper keyboard. 

In Animal Rescue, animals are running loose in the zoo! Students must draw a letter card and put the animals back in their proper “cages” by finding the corresponding keys on the keyboard.

Of course, you can play both of these games right at the piano, too! But if your students are anything like mine, they will enjoy an opportunity to jump off the bench and play a game on the floor for a few minutes at the end of their lesson. (Maybe you will, too!)

Penguin piano build a keyboard printable game for beginner piano students


Penguin Piano is an extension of this activity. I like to use it as a take-home assignment that follows our games of Animal Rescue and Race. Students can take home one worksheet to cut and paste, or they can take home two sheets and race a parent or a sibling to form a proper keyboard with labelled keys.

You can find these last 3 games in my shop, as well as other resources for teaching piano! All come with a studio license, so you can print as many copies as you need for your students.

What are some of your favorite games for beginning piano students? Let me know in the comments!

Keep up with my writing by subscribing to At Home with Classical Piano on Substack.

What a Beginner Piano Lesson Looks Like in My Studio 

Do you ever wonder what other teachers do in their lessons? I do! 

I thought it would be fun to share what a beginner piano lesson looks like in my studio for kids ages 6-9. For this age group, I tend to start with either the Faber Piano Adventures series or the Alfred Premier series. Both methods are pretty similar with plenty of explanation to guide non-musical parents in helping their children at home. They start with off-staff notation on black keys and then move to C major 5-finger positions. I use the Lesson Book, Performance Book, and Theory Book.

Each lesson starts with a brief conversation. I greet the student, ask how their week is going, and then we chat briefly about how school is going, what new book they are reading, how my dog Jasper is today, or anything else they want to tell me! 

Then I ask them to play their assigned songs from the week before. Usually students have mastered these simple songs, and they receive a sticker in their book and an “X” on their Piano-opoly board. Often I will choose one of their songs to play the suggested duet accompaniment with, and we play together. (This is a wonderful way to help students prepare for performances - playing through music without stopping - and to practice a steady beat. And, it's fun!)

We then move to the next song in their book and I teach any new concepts as well as how to play the song. We will go through 2-4 songs together, depending on how quickly the student grasps the new information. I want to be confident that they have the information they need to go home and practice the music without me!  

At this point, if I notice the student needs more practice on a concept, or simply another piece or two to play at the same “level,” I will pull out the Performance book and teach and assign a song or two from it. My beginners don't play in formal recitals, but we do prepare for informal performances for peers at our quarterly group lessons. They may play a piece from the Performance Book or from their Lesson Book at these meetings. Essentially, I use the Performance Book as another resource to reinforce concepts from the Lesson Book. We may or may not cover all the music in that book.

The last 5 minutes is dedicated to music theory. We talk through the theory concept in the book and I may even have the student begin the exercise to make sure he understands how to do it, and then I assign the corresponding pages to the Lesson Book for their take-home assignment.

That's it! Our 30-minute lessons fly by, the students know what to expect, and we are able to go at a nice pace in this manner. Sometimes I will supplement with a game from my shop or something that I have found online, either because we have covered the music that I want to in the lesson in a shorter amount of time, or I'm finding that the student needs more practice with a concept. Or sometimes, I just want to mix it up and start a lesson off with a game because it's fun!

What do your beginner lessons look like? Let me know in the comments!

Keep up with my writing by subscribing to At Home with Classical Piano on Substack.

How to Write a Good Piano Studio Policy 

How many times have you set your piano lesson schedule and explained how missed lessons work, only to have a parent come to you asking for something other than what you offer? For example, perhaps you teach from 3-7pm Monday-Thursday, but a parent asks if you can teach at 7:30pm…or if you can teach their child on Fridays? 

Does this give you pause? Do you hesitate in a scenario like this and end up giving in because you could use the money or you want others to see you as gracious and flexible? I have been there! But it is not a good place to be. Going outside of the parameters you have set for your piano studio can cause regret and end up causing resentment. There’s a better way!

Having a good studio policy in place can prevent many such discussions - and more - but you must be clear about what you offer and then stick to your policy

What is a studio policy?

Simply, a studio policy is a document that states what taking piano lessons with you looks like, from which days and hours you teach to how you handle missed lessons to how you handle payment. It also gives information about your expectations for practice and lesson attendance. And it explains what you teach and why you structure the lessons the way you do.

How do I create a studio policy?

You can start by writing a 1–2 page document stating what you offer and what your expectations are. A good studio policy will include the following elements:

  1. Your philosophy of teaching (how and why you teach)
  2. Who you teach 
  3. When and where you teach
  4. What kinds of lessons you offer
  5. How you accept payment
  6. How you handle missed lessons
  7. What your expectations for students (and parents) are during lessons and in at-home practice

I introduce my studio policy to everyone who interviews to be part of my studio. After the interview, a printed copy goes home with the parent along with a copy of my studio calendar and a contract for payment. In order to secure lessons with me, the contract must come back signed by both parent and student, indicating that they agree to my policy and terms for payment. (An additional printed copy of the policy and studio calendar go in each student’s binder. Learn more about how I use binders here!)

Having a clear policy in place shows parents that you are a professional and have parameters around how you run your business. After the initial expectations are stated, the policy becomes a tool that you can refer back to when questions come up concerning payment, missed lessons, practicing, and so forth. When you are asked to make an exception, you are free to be flexible, but you are also free to gently but firmly refer back to the policy with “No, I’m not able to do such-and-such; instead, this is what I offer.” 

Having a good policy in place and the determination to hold fast to the expectations you set for the studio can resolve many potential conflicts and help you focus your time and energy on teaching!

What are some boundaries you have set in your studio policy that have been helpful in your studio? Let me know in the comments!

Keep up with my writing by subscribing to At Home with Classical Piano on Substack.

How to Practice the Piano as an Adult 

How to practice the piano as an adult

Commit to doing one thing better.

That's it: one thing! What is the one thing you want to have accomplished today at the piano?

We can easily over-complicate things as adults. We think we need to come up with a warm-up routine, or read through a whole piece from start to finish before we start practicing, or…[fill in the blank]. But often we just need to commit to doing one thing better.

I must admit: my summer was not filled with much practice time at all! Instead, I spent time with my three teenaged daughters, taught piano lessons, worked on some product development, and spent time evaluating and honing systems in my music studio. So when I returned to the piano last week, I had some decisions to make! What music do I want to study this season? What performance goal am I working towards? Which piece will I work on first?

I picked up some music that has been lying dormant for a few months and returned to it: Liszt's Jeux D'eau, Debussy's Sunken Cathedral, various Chopin pieces, a Bach suite, a new piece by Heino Kaski… And as I've been reading through, I've started noting what needs work! Some music needs harmonic analysis, others need slow work and decision-making about fingerings; another piece needs to be committed to memory because there are too many awkward jumps; still another piece needs technical work. 

I pulled out my practice journal again and wrote down what pieces I'm working on this year, and then made a short list of what I need to do next. I love doing this because it gives me a focus. The next time I return to the piano, I'll know exactly what to start on. Whether I have ten minutes or an hour, I will be able to grab a piece, start working, and accomplish something because I've made a note of what specifically needs work.

Whether you are working on music for your personal growth, a performance, or just to keep up with your students, try keeping track in a notebook or on a piece of paper what you accomplish each day and what you want to work on next. Be specific. Write in measure numbers. Tell yourself what needs work. Be your own teacher. 

Little gains add up to big wins. Do one thing better today!

For more thoughts on practicing, see:

Using a Practice Journal for More Effective Practicing

Always Be Prepared: Three Songs at the Ready

Practicing in Sections

Backwards Practice

How I Memorize a Piece of Music

How to Prepare for Accompanying an Instrumental Sonata (or Concerto) Quickly

Keep up with my writing by subscribing to At Home with Classical Piano on Substack.

Introducing...The Scarlatti Composer Kit! 

Scarlatti composer kit

I had so much fun putting this Composer Kit together! The life of Domenico Scarlatti is fascinating - his encounters with royalty, his different stylistic periods, his infamous duel with George Frederick Handel in Rome…and his experiments at the keyboard offer much fodder for discussion and exploration in student compositions!

Scarlatti wrote 555 keyboard sonatas, although not in the sonata-allegro form that we are familiar with in the Classical era. His sonatas are often in two parts, and include techniques like imitation, counterpoint, fast repeated notes, and crossing hands. He also plays with Baroque dance form and fiery dance rhythms from Spain, definitely a “Renaissance man”!

Students will love engaging in a Tic-Tac-Toe duel of organs and harpsichords, creating copycat fugues in a fun group game at the piano, and trying their hand at composition in the style of Scarlatti.

The Scarlatti Kit, like all of the Composer Kits in my shop, contains a 1-page biography (one sheet at the intermediate level, and one for younger readers), two games suitable for playing student-teacher or in a group setting, a playlist with suggestions of what to listen for, and a composition activity (one for beginners and one for intermediates).

I use these kits in group lessons once a quarter, but the materials are also great for composer study within private lessons, in homeschool co-op music classes, or as an independent take-home activity.

Find the Scarlatti kit here!

For more Composer Kits and a free resource, check out this link!

How I Choose Music for My Piano Students 

“…he really enjoyed the lead sheets at Christmas time. I also appreciate your positivity and the excellent piece curation you do.” - Piano parent

Choosing music for our piano students can sometimes be a difficult task! The variety of method books available to piano teachers gives us no lack of options, but if we are not devoted to one method or another (or we realize a student needs something more/different), finding just the right music that suits the interests and abilities of our students can feel daunting.

I have by no means perfected the process, but thought I would give you a glimpse of what I am using this year in my studio:

For beginners (ages 5-8) - Faber Piano Adventures or Alfred Premier. These methods are pretty similar, starting the student on black keys with off-staff notation before introducing landmark notes and the grand staff. I like them because I have been using them for years, the pages aren't too cluttered, and the directions are simple enough for non-musical parents to understand and assist their children with at home. I use the Lesson book, Theory book, and Performance book in each method for the first two years. I also use the Faber supplemental books for Christmas and summer (Jazz/Blues, Rock and Roll, Disney). In year three, I add a Faber Piano Literature book as we begin to transition into “real” literature.

For beginners (pre-teen/teen) - Supersonics, Wunderkeys Pop Staff Piano, or Alfred Older Beginner. This age group generally needs easy wins and music that sounds appealing right away. They are motivated by cool-sounding or familiar music, but still need to build proper technique and reading skills. I like Supersonics and Wunderkeys Pop Staff Piano for the “cool” factor and steady progression of skills. The Alfred method is solid, but in my opinion less appealing for modern kids as the songs tend to be folk songs. (Alfred, we need an update!) For theory, I am trying out Mark Sarnecki's Elementary Music Theory books this year. I love the clean layout of the pages and the fact that he incorporates music history into the lessons. I also love Worship at the Keys by Donna Gielow McFarland for this age. A lot of my students come wanting to learn how to play in a worship band at church, and Donna's book is a wonderful introduction to reading chord charts and lead sheets; she incorporates a number of modern songs!

For early intermediate - RCM (Royal Conservatory of Music) Etudes books, Faber Piano Literature books, Mark Sarnecki's Essential Music Theory books, Diversions 1 and 2 by Juan Cabeza, various supplemental literature. My “core” for my early intermediates is an Etude book, a Piano Literature book, and a Theory book. We also follow the RCM technique charts for learning scales and chords. I add to that depending on the students' interests and skills that need addressing. For instance, I have one student who is fabulous at rhythms and loves Celtic music. He is working through the Diversions books (each piece a “quick win” and a chance to analyze patterns and work on transposing on sight), a Celtic book, and a fun Mario book. Another pair of students works very slowly through their core books (practicing isn't consistent), so we don't do much beyond that other than adding Christmas music in Nov/Dec. Another student loves Classical music and we've been supplementing with some of Frank Lynes' sonatinas and other music found on IMSLP.org. 

The older intermediate and advanced students that I have taught generally have been transfer students and have come with repertoire they want to work on. Often it is above their reading level, and I supplement with easier pieces and scales and chords work to improve their sightreading and technique.

It is important for students who are intermediate level to have music at their reading level (learn in 1 day), a little above their reading level (learn in 1 week), and then a stretch goal (learn in a month+). They need to be able to play music for pleasure (those quick wins!) as well as be challenged to practice to achieve a long-range goal. And if we can find music that accomplishes both things and that the student enjoys working on, we can spend more of our time enjoying the teaching and learning process and less time coaxing students to practice things that are uninteresting or too difficult for them to see much short-term progress.

How do you choose music in your studio? Do you have methods/publishers/composers that you find yourself turning to again and again? Let me know in the comments!

Keep up with my writing by subscribing to At Home with Classical Piano on Substack.

What's in my Student Piano Binders 

Part of my studio prep for fall is assembling Piano Binders for my new students and updating the binders of returning students. I grew up with a binder as a student myself, and in my studio I have tweaked the process a little to fit my teaching style. 

As part of their tuition, my piano students receive books and materials that I purchase for their lessons, including these binders. I use a 1-inch white, 3-ring binder with plastic cover so I can customize the cover. Here's what goes inside:

Piano-opoly practice incentive

Piano-opoly - My simple practice incentive game board slides into the plastic pocket on the outside of the binder and students can see at a glance how close they are to earning a prize!

Zippered pouch - I like these from Amazon, with a see-through mesh pocket and two zippered compartments. We use these for flashcards and small game pieces that I send home for practice.

Piano Practice Tracker - This is the student's assignment sheet. I designed it myself (there are several color variations, and you can get it for free in my shop!). If you print it double-sided and upside-down, you can punch it to put in the binder, and then use the back of it without re-punching the sheet by just flipping it over! Each week during the student's lesson, I fill out their practice plan, and it is their job to check the sheet each day to see what they are to work on, and put an “X” or write in the time on each day that they've practiced.

Studio Calendar - This goes in a plastic page protector and includes all the dates for lessons and breaks during the year.

Studio Policy - No excuses! I put this in a plastic page protector as well. It includes lesson information, practice tips, tuition and payment info, and my missed lesson policy. Parents receive an updated version via email at the beginning of each school year as well.

Syllabus - This is either a skills checklist based on beginning method books for my young students, or the RCM levelled checklists that you can find for free in my shop.

Technique - Printed scale and arpeggio charts with fingerings.

Music - Any sheet music that I give out during the school year goes here.

Composition - Student compositions that are assigned during the year during our group lessons (using materials from my Composer Kits) or private lessons.

Scales/Chords/Key Signatures - These are 3 separate tabs, but are meant to hold papers detailing how major and minor scales, chords, and key signatures are put together.

Music History - Students collect composer biographies (from my Composer Kits) and they live here.

The Piano Binders serve as a growing library of musical information for students as well as a place to house their assignments. The binders grow with the students and are a physical reminder of the hard work they put into practicing and music study, forming a portfolio of sorts that celebrates their achievements!

Do you use binders in your studio? I'd love to hear what you do with yours! Tell me in the comments!

Keep up with my writing by subscribing to At Home with Classical Piano on Substack.

Making Time for Composer Study in the Piano Studio 

Do you make time for composer study in your piano studio? 

Lesson time seems to always be at a premium. How does one fit repertoire study, technique, music theory, sightreading, and ear training into a 30- or 45-minute lesson, let alone music history?! If you are like me, you spend most of your time teaching repertoire, taking a few minutes out for technique and a few more for theory, and the rest happens “if there is extra time.” That is why most of my discussions about specific composers, their lives, and their music, happen in my group lesson settings rather than in private lessons.

Composer Study in Community

composer kits for group lessons

Every 6 weeks or so my piano students come to a group lesson with 3-5 other students for a community-building time of music theory games, informal performances, and in-depth composer study. We enjoy being together as a group, and the 60-minute timeframe allows for discussions of a composer's life and music. (Lest you think I conduct these discussions like a college lecture, let me assure you that our time together is quite lively and we switch activities every 10-15 minutes!)

Coming up with Resources

I used to cobble together resources I found on the internet, choosing composers I thought students might have some background knowledge of or whose music they were starting to encounter in their lessons. But recently I decided to organize my thoughts a little better and plan ahead for the school year so that when group lessons come around, the planning is already done! 

Introducing…the Composer Kit!

For each composer we study this year, we will be reading a short biography; listening to selected works from a pre-formed playlist; composing using a musical technique that that composer used; and playing games that reinforce music theory concepts, new vocabulary, composer trivia, memory techniques, and more! 

I am really excited about introducing my students to a variety of composers in this way. The materials in each kit are highly interactive and designed specifically for multi-age, multi-level (beginner and intermediate) groups. And because students are learning through play, they are much more apt to remember the information and start seeing these composers as “real” people rather than figures in a museum or history book. As they play around with different composition techniques, they will start to see what is possible in the realm of composing…and will start to identify concepts in their own repertoire study.

composer kits for group lessons, private piano lessons, homeschool

Designed for Multi-age, Multi-level Groups

The student worksheets are levelled, so beginners and intermediate have their own pages to work on with individually tailored assignments; however, the concepts are linked, so everyone will feel like they are “on the same page”! The worksheets fit nicely into a 3-ring binder, so students can collect a biography for each composer, followed by an example of their composing technique.

Easy Prep, Planning is Done For You!

The teacher's guide shows a suggested timeline and lesson plan for the activities with ideas for extending learning. The games are low- to no-prep and can be reused in the piano studio.

It feels great to have my group lessons planned out for the year, with all the materials in one place and ready to go! You can learn more about Composer Kits here!

Keep up with my writing by subscribing to At Home with Classical Piano on Substack.

Pros and Cons to Teaching Piano to Homeschoolers 

teaching piano to homeschoolers

Are you considering adding homeschoolers to your piano studio? For the past several years I have worked to attract homeschoolers to my studio in an effort to concentrate my teaching time to the hours when my own girls are in school. (I wrote more about that here.) Here are some of the pros and cons I have experienced in my work with homeschooling families:

Note: Of course, every family is different and it is impossible to say that all homeschooling families you encounter will function this way; however, these are some general things I have found to be true.

Pros:

🎵 Homeschool families are purposeful about their children's education and want music lessons to be a part of a well-rounded education. Because of this, they will often schedule practice time into their homeschool day, just as they do schoolwork. (Yay for consistent practice time!)

🎵 Homeschool families have time available during the day for lessons, potentially expanding your teaching hours.

🎵 Homeschool families often have multiple children, and younger siblings will often follow in their older siblings' footsteps by taking piano lessons.

Cons:

🚸 Because homeschool families control their own schedules, they may take multiple weeks off at a time, or even a month's vacation.

🚸 Homeschool families are not bound to the public school calendar. If you also teach children that attend public school, this means that holiday breaks can happen at different times.

In my experience, the Pros greatly outweigh the Cons, which I find mostly have to do with scheduling. I love building relationships with families and teaching multiple siblings, getting the bulk of my teaching done weekday mornings, and having the support of parents. 

Regarding the Cons, I believe that if you are clear on your studio offerings - including how many lessons you offer each month/semester/year, what your make-up policy is, and how payment happens - you can navigate the scheduling hiccups with ease. (At any rate, it is miles easier than trying to work around after-school sports and drama schedules!) 

I offer my homeschooling families the same tuition package that I offer my public school kids: weekly private lessons and quarterly group lessons. I love introducing my students to each other and watching them form relationships during our group lessons, and consider the community-building just as important as the musical knowledge they gain during these times. (Find out more about how to run successful group lessons here!)

Let me know if you have any questions in the Comment section below!

Keep up with my writing by subscribing to At Home with Classical Piano on Substack.

Taming the Group: Management Strategies for Piano Teachers 

As piano teachers, we often choose to teach private lessons because we like the one-on-one relationship with our students. We typically teach out of our homes and have introverted personalities, enjoying the freedom to teach a block of lessons and then take a break to re-charge. This is my preferred approach 😊; however, there are also times when we want to build community in our studio, giving our students opportunities to perform for each other and get to know other pianists “like them.” This can take the form of recitals, holiday or end-of-term piano parties, summer piano camps, monthly workshops, or quarterly group lessons. But what is a teacher to do who isn’t comfortable managing groups of students?

In my late twenties I transitioned from being a private piano teacher to teaching first grade in a public school. While I had worked in Vacation Bible Schools for years and even ran an after-school program at a YMCA for grade-school students, managing kids in a more formal learning environment required me to have an even better grasp on management strategies. Here are some tried-and-true tips that I learned during my teacher training that can help you lead a successful camp/workshop/group lesson, whether you have a group of 4 or 30 students:

Keep your rules short and memorable: Be kind and have fun. 

Explain your rules: Be kind means that we will listen when others are talking, be respectful in what we say, etc.

Explain the consequences for unwanted behavior:

  1. Verbal warning
  2. [Short] time-out away from activity or must sit with the teacher
  3. Talk with parent at the end of camp

Have a plan for getting students’ attention when it gets loud. Choose one of the following or make up your own: 

  1. I clap a rhythm and you clap it back; 
  2. I say, “Campers, attention please!” and you put your hands in the air and look at me; 
  3. I say, “Give me five” and you respond with eyes on me, ears listening, mouth quiet, hands to yourself, heart ready to learn.

Yelling over students’ voices is never effective. If you have verbal instructions, wait until there is a drop in the noise level, and then take advantage of it by calling students to attention. If there is no drop, try recruiting students one at a time by saying “If you hear me, clap once,” then, “If you hear me, clap twice.”

It is best to practice your call-to-attention before you need it, so do it often in the “honeymoon” phase of the first day. Make it a game to see who listens first!

Befriend your tricky kids. You know the ones – the kids who, if given the chance, will act out and pull your whole group quickly into chaos. Know their names, make a point to connect with them early in the day, and keep them close. Assign them a job that gives them positive attention. 

My best management strategy is to get ahead of disruptive behavior by befriending kids, setting clear expectations, and having a plan in place for bringing the group back to attention. With a little forethought and consistent follow-through, you can have a successful and enjoyable time with groups of students!

Need a plan for a 60-minute group lesson? Check out my free Group Lesson Planning template below:

group lesson planning template

Keep up with my writing by subscribing to At Home with Classical Piano on Substack.

Music of the World Piano Camp 

This summer I ran two piano camps for my students and any interested friends/siblings/potential students. One was Joy Morin's “So You Want to be a Composer?” and the other was her “Music of the World” camp. Both curriculums are fantastic and served my two groups of students well.

I've written about the composer camp elsewhere, but in brief, I ran this camp with six 6-12 year-olds: two current piano students of mine, two students who take Suzuki violin lessons, and two former campers with some beginning knowledge of music and the piano. Since it was a smaller group, I was able to give individualized attention to students as they worked on their own compositions. The curriculum definitely requires kids to have the ability to listen and discuss music in a focused manner, although it has plenty of variety to keep everyone engaged and having fun!

The second camp I ran was Joy's “Music of the World,” and this was with an entirely different group of students! I hosted 11 kids for this one, more on the younger side (several 6-year-olds) and in their beginning years of piano. This was a very craft-heavy camp, as each day we cut and pasted facts and illustrations related to each country into a “lapbook” that the students could take home. Kids also had the opportunity to make an instrument each day.

Because I knew I had a younger group (and a lot of siblings!), I researched some outdoor games to supplement with. We ended up playing an egg-and-spoon game for our visit to Australia, throwing pennies into a frog's mouth during our time in Peru, kicking hacky sacks on the day we visited China, and playing mancala (with egg cartons and beans!) when we went to Ghana.

Many of the campers from both weeks had attended my Piano Camps for beginners last year, and they were thrilled to be back for more.

If you're looking for a ready-made camp curriculum for your students, check out these camps by Joy:

So You Want to Be a Composer?

Music of the World

And my camps designed for beginner students with 0-2 years of piano:

The Great Music Race

Musical Secret Agent

What other camps have you hosted in the past? If you have a curriculum to recommend, leave a link in the comments!

Keep up with my writing by subscribing to At Home with Classical Piano on Substack.

How I Found Homeschoolers for my Piano Studio 

finding homeschool students for piano lessons

I’m heading into year three of teaching piano, after a multi-year hiatus due to raising my own kids. Our three girls still live at home, but are at an age where they are more independent and starting to be able to drive themselves places. I have had the privilege of being a stay-at-home mom for their growing-up years, and have always tried to work music around our family life. I have taken random freelancing gigs, hosted concerts in my home, and played for church and choirs during times my husband could watch the girls. When I started to think about resuming piano lessons, I decided I wanted to try to attract homeschool students so I could keep my afternoons and evenings free to attend our girls’ sports games and drama productions. 

Finding homeschoolers

Year One 1️⃣: I sent emails out to friends and family, letting everyone know that I was teaching again and had daytime hours available for homeschoolers. I began reaching out to homeschool groups on Facebook (the ones that let you advertise), and I contacted friends I knew who either were a part of homeschool co-ops or had been in the past. I also passed out fliers at my local farmers market. That year I gained 4 students from 3 different families. Total: 4

Year One Summer 🌞: I created two piano camps and invited my existing students, spread the word in Facebook groups, and posted on my kids’ school group. I filled both camps with 20 students and earned a little extra income. No new homeschoolers, but the camps did whet the appetite of some of the participants for future lessons.

Year Two 2️⃣: I became more intentional about posting in Facebook groups and expanded to local neighborhood groups and one run by my church. I posted regularly, once every month, in each group. I lost two students and gained a sibling and 3 more homeschool students. I decided to open up limited hours on Saturday mornings to accommodate non-homeschoolers, and gained 4 more students Total: 10

Year Two Summer 🌞: I heard from a parent of last year’s campers and gained 2 more students. I lost a student to graduation but gained another sibling. A parent who had inquired over a year ago in a Facebook group reached out, and I gained one more student. Total: 13

I held two more camps with a total of 17 kids. The camps were a big hit again, and I received 2 new inquiries. 

I actually turned down the last two inquiries, as I decided to cap my numbers at 13 this year. Besides teaching, I have a regular choir gig, am building my online business that serves piano teachers and choral accompanists, and want to leave room to continue freelance accompanying as well. Right now, 13 feels like a good number.

how to attract homeschool students to piano lesson studio

Lessons in Marketing to Homeschoolers

I’ve learned a few things about marketing in the last two years (and am sure I have lots more to learn!):

1. Word of mouth is a great way to gain students, but it takes time for “word to get around”

2. Consistent, repeated advertising in Facebook groups eventually yielded results 

3. Camps are a fantastic way to advertise lessons (of course, you also have to market your camps…) 

4. Although I have an active website, I don’t generally attract new students with it. (It does draw some inquiries, however, and is where I first point interested parents, as well as where I house my new student intake form.)

5. Siblings are one way to organically grow your studio 

6. Growth takes time ⌚

While it took some time to attract the students that I wanted in my studio,  I am happy that I set the parameters for the times I wanted to teach, as I now have a schedule that works with my family life.

I encourage you to think of how you can create a studio that works for you. Maybe that means group lessons, hiring a teacher to teach some of your students in another space, teaching adults during the day, putting together a music class or group lessons for a group of homeschoolers at a co-op, or…? Don’t be afraid to think outside the box and create the kind of schedule that fits the season you are in!

What does your studio look like currently? Let me know in the comments how you are working to create a studio that works best for your situation!

If you want to use my camps as a way to attract new students, either in a 2-hour-a-day/4 day camp or in a modified weekly class format, check them out below:

MSA: Musical Secret Agent

Musical Secret Agent Piano Camp curriculum

The Great Music Race

The Great Music Race Piano Camp curriculum


Keep up with my writing by subscribing to At Home with Classical Piano on Substack.

Group Lesson Planning Made Easy 

Group lesson planning made easy

Let's talk about Group Lessons! I'm not talking about regular weekly piano lessons with a group of students; rather, a once-a-month or once-a-quarter get-together with your private piano students where students perform for each other, play games to reinforce music theory concepts, and learn about a topic in music history like a composer. In my piano studio, we call them “Piano Parties”!

Group lesson “Piano Parties” are an essential part of my piano studio offerings. So much of piano study is done in isolation that we forget there are others “just like us” who are learning and pushing through challenges at the piano bench! It is important for students of all ages to experience music in community with others, to hear others play, and to collaborate in fun musical experiences. My group lessons serve to form community among the students, provide for more in-depth teaching time and reinforcement of music theory and history concepts, offer a welcoming space for informal performances, and give me time every 4-6 weeks to offer make-ups or work on admin/lesson prep. 

Two big questions always come up: “How do you structure your Group Lessons?” and, “How do you schedule your Group Lessons?”

STRUCTURE

My Group Lessons always follow a simple format: an opening game, student performances, learning about a composer, and closing games. I have a collection of music theory games that are accessible to beginner and intermediate students of different ages and are easy to incorporate in a mixed group setting. I've put together a free Group Lesson template (click HERE to get yours!) of my schedule, along with a resource list of over a dozen music theory games and suggestions for composer-focused activities that you can use to help guide your planning.

group lesson plan template free printable download

SCHEDULE

It can be tricky to schedule private students for a group lesson. The way I accomplish this is by publishing a calendar of my private and group lesson weeks for my piano families, and releasing it in the spring so that families can plan for them. Group lessons take place during my normal private lesson days and times and are in lieu of the students' private lessons for that week. So, for example, if I teach half-hour private lessons on Saturdays from 8:30am-12:30pm, I will schedule an hour group lesson on a Saturday from 9:00-10:00am. This overlaps the normal time of some of my private students, and isn't too far off from the remaining students' lesson times. I schedule the same way for my weekday lessons.

Group lesson games

There are always families who have a conflict on some week or other, and they may opt to come to a different group lesson day that particular week, or if that doesn't work, they miss the lesson altogether. In the latter case, I will send home the activities/worksheets from the group lesson for them to complete on their own. 

Because I operate my studio on a tuition model, group lessons are bundled into my studio offerings for the year and are subject to the same “no make-up” policy as that of my private lessons. 

I hope this helps you think about how you can make group lessons a part of your piano studio and takes some of the guesswork out of planning a fun and productive time with your students!

Click HERE to get your free Group Lesson template!

Let me know if you have any questions in the Comment section below!

Keep up with my writing by subscribing to At Home with Classical Piano on Substack.

Summer Piano Lesson Ideas 

For my piano studio, students have the option of taking 6 weeks of lessons in the summer in addition to, or instead of, attending a Piano Camp. Because we work so hard during the year, and because there are often areas in which students can use a bit of review, I like using the summer to “go sideways.” 

If you are unfamiliar with the term, going sideways means learning music at the same level that a student is at, intentionally staying there in order to solidify concepts. This can happen at any time during the school year when it seems a student isn’t fully mastering a piece before it feels like it’s time to move on. Summer, with its laid-back feel, is a great opportunity to “take a break” from your regular piano lesson plan and review concepts through games and new music.

If you use method books, you will find that the pacing is just right for some students, but far too slow or even too fast for other students. This is one reason you will find a lot of “supplemental” books at one level – so that a student can continue to work on the same rhythmic, melodic, or harmonic concepts to achieve mastery before learning something new. 

BEGINNER STUDENTS 

For my beginner students who need sideways practice this summer, we will be working through a same-level method book. Since we are using Faber Piano Adventures, this will likely be a Rock ‘n’ Roll, Jazz and Blues, or Disney book! 

We will also be playing games to reinforce finding the landmark keys of treble G, middle C, and bass F on the piano, and recognizing stepwise direction on the staff (up/down, left/right), as well as reviewing the rhythmic names and values of notes and rests. These are common challenges for beginners, and developmentally appropriate for them as they are learning similar concepts in literacy at school (recognizing letters and phonemes and sight words, reading left to right, and developing fluency in reading combinations of words). 

Animal Rescue and Race is a great way to teach and review keyboard geography 

Rhythm Playing Cards are fun to use when learning rhythm symbols and their values

INTERMEDIATE STUDENTS 

Intermediate students may study method books during the school year or work through the myriads of piano literature available for them. Summer lessons might look like working on duet literature, practicing sightreading skills with fun music a level or two below their current level, or focusing on music in certain keys to reinforce reading in a key signature and correct scale and arpeggio fingering. Alternatively, students might like to try out a specific genre, exploring jazz, gospel, pop, or celtic music.

I also like to introduce my intermediate students to lead sheets. This is a fun way to teach harmony and chord inversions, and to give students an opportunity to experiment with improvisation and transposition.

Rodgers and Hammerstein Piano Duet Book is one of my favorites to work on with students!

Chrissy Ricker has a variety of free resources in all of these areas 

ADVANCED STUDENTS 

Advanced students often have competing interests, full schedules during the school year, and even a work schedule to navigate. Summer can be a good time to explore a genre they are interested in, have fun sightreading duets together, or listen to a variety of music by one (or several) composers to help narrow down choices for study in the new school year. 

Check out IMSLP for classical music in the public domain that you can download and print, and for recordings. Search by composer, time period, instrument, and level ("instrument difficulty")!

What do you do differently in summer lessons? Let me know in the comments below!

Keep up with my writing by subscribing to At Home with Classical Piano on Substack.

Summer Piano Camp #1: So You Want to Be a Composer? 

This week I hosted the first of two Piano Camps this summer. Unlike last year, when I wrote the The Great Music Race and MSA: Musical Secret Agent camp curriculum myself, I chose to put on two fantastic camps written by Joy Morin.
 
So You Want to Be a Composer? was this week's camp and it is chock-full of music to listen to and analyze, composition activities, and musical instrument crafts. We had more than enough to fill our time, and each camper walked away with 6-7 compositions of their very own creation! 
 
I had six students ages 6-12 attend, some of whom take piano lessons from me, and others (piano and violin students from different teachers) who attended my camps last year and wanted to come back for more!
 
We had such a fun time together with the wide variety of activities and composition techniques presented each day.
 
Here are a few of our student compositions:

Inspired by nature

To be played on a Watercolor Xylophone

Body percussion - a hit with the kids!

Hard work on one main composition all week

I inputted each student's week-long composition into music software (MuseScore is free online!) and printed it out so they could take home their very own “published” composition!

We put on a brief Composer's Showcase at the end of the last day, where each student chose to perform one of their pieces for their parents and siblings. We also viewed a slideshow of all the fun activities and hard work everyone engaged in this week.

Thanks, Joy, for putting together such a fun and rewarding camp!

For more on Piano Camps, check out these blog posts:

So You Want to Be a Composer? (Joy's camp)

What Does a Piano Camp Look Like? (free webinar)

The Great Music Race Piano Camp for Beginners

The Musical Secret Agent Camp for Beginners

Are you running a camp this summer? Let me know in the comments!

Keep up with my writing by subscribing to At Home with Classical Piano on Substack.

Free Billing Software for Collaborative Pianists (Accompanists) and Piano Teachers 

free billing software for collaborative pianists accompanists and piano teachers

Do you have a good system for billing, either for collaborative work or piano teaching, or both?

For the past two years I have used the free version of an online software called Wave for invoicing and all of my accounting. I have found it to be a great way of keeping track of my business finances.

Currently, my business activity consists of accompanying a weekly community choir, teaching a private piano studio of 11 students, selling digital products online, and collaborative freelance gigs. By using Wave for all of these activities, I am able to:

  • Use a customizable invoice template with my logo and business information
  • Save customer contact information
  • Keep track of paid and unpaid invoices
  • Record sales
  • Record expenses
  • View and print reports for accounting and tax purposes
  • Duplicate past invoices for recurring charges
  • Create categories and descriptions of recurring billable activities that Wave displays in a drop-down menu (45-minute piano lesson, 30-minute piano lesson, 30-minute rehearsal and Solo and Ensemble performance, 2.5 hour choir rehearsal, etc.)

There is some legwork on my end to get invoices to my clients. The free version of Wave only offers a link or downloadable PDF of invoices, so I have to email each customer when I am ready to bill. For now, I am willing to invest that bit of time in exchange for getting to use a free tool. Wave does have automations available for paid subscribers, so that is an option for those who want that feature. At any given time, I am able to view a report of income and expenses broken down by categories I have assigned. There are many reports available at the click of a button!

Wave is a great tool for collaborative pianists (or “accompanists” if you prefer the old school title!) and piano teachers to keep track of billing and payments in a professional, organized fashion. I encourage you to give it a try!

Keep up with my writing by subscribing to At Home with Classical Piano on Substack.

Image credit: David Yonatan González from Pixabay

Summer Music Camp T-shirts DIY 

I am always looking for ways to cut costs, and designing my own t-shirts for my Summer Music Camps is one way I can do that! 

summer music camp t-shirt design png svgsummer music camp t-shirt diy design png svg

Last year, I held two different camps for my beginner piano students and new recruits (The Great Music Race and MSA: Musical Secret Agent) and I designed a t-shirt for each specific camp. I was thrilled with the results (you can see them in my shop - click here and scroll down to Piano Merch). 

However, this year, I decided to try something a little simpler. I am holding two new camps, and instead of trying to produce a separate t-shirt for each one, I decided to go with a design that works for both. I think it turned out pretty well!

I made the design as a 300 dpi PNG file as well as a SVG file, so it can be used as an iron-on transfer or with a cutting machine. Iron-on transfer sheets can be purchased from any office supply store or online, and you print the design on them from your personal printer! (Be sure to choose “light” if you're printing on a light-colored shirt and “dark” if you're printing on a dark-colored shirt.)

Blank t-shirts can be purchased from a local craft store, like Michael's, or online, in a variety of colors and sizes. You can even buy them in bulk at a discounted price. I like to purchase youth shirts for my campers and a few adult sizes for myself and my teenage helpers!

Get the design for your DIY Summer Music Camp t-shirts in my shop.